Pages

Showing posts with label 16/2 mercerized cotton. Show all posts

Monday, September 30, 2013

Golden Gate Bound

This is part two of my earlier post  detailing a weaving commission, so if you're running behind, you might want to catch the first part.  (Details and draft are there)

I've been quietly beavering away on a customer order from my Etsy shop "Thrums Textiles" . They requested two runners featuring the Gothic Diamond pattern, except these were to be hemmed and longer at sixty inches.  Also to be in two shades of gray.....

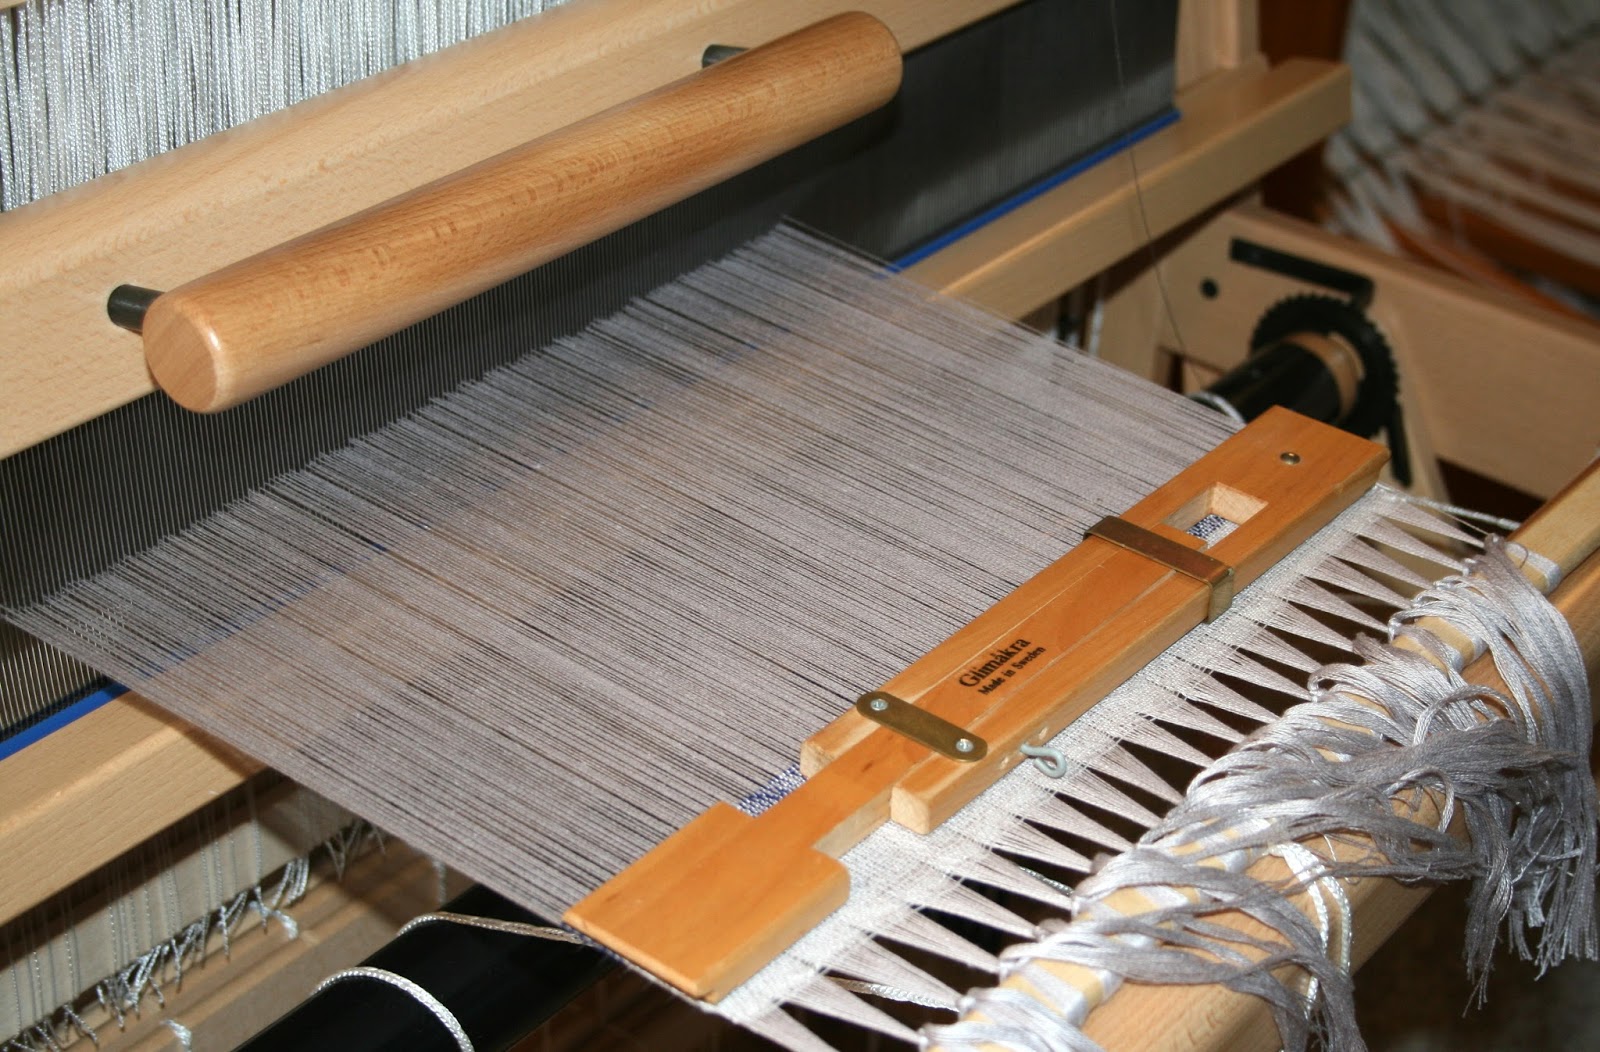
So once the small error in the reed was corrected, I got started again and I must say that the weaving went very well. I think the help from Bruce in tensioning the threads as the warp was wound  was the key to nice even tension. There was no issue with soft edges, and the only issue I had was that the floating selvedge thread broke a couple of times on the right hand side. (It always seems to be the right side. Any theories?)

I wove both runners to approximately sixty two inches and both had a six inch hem allowance, which will reduce to two inches on either end when all complete.  I even got some nice samples at the end for my records.

Now, normally I like to cut my new projects apart using the serger, but the bunching of the serger threads can add a line of bulk in a fine cloth made from cotton this fine.  So I had to take a different tack with this.


I switched to the sewing machine instead. What I need to do is stabilize the edges to prevent unravelling so I used a stitched zig zag. In the second picture you can see my scrap cloth with the silver stitches as practice.
(Click on any image to enlarge). It worked very well! All was secure and no bulky line.

Next up, getting the hems ready:


Steam press and check length is even.


Fold up to an even two inches and steam press again.


Fold up final fold to *just* to the bottom edge of the hem stitching, steam press again and pin in place.
Now they are ready for s little evenings entertainment!


The stitching was rather fine and so it took me time and (surprise) daylight hours only. I just about went blind trying it by night!  {Here is a link to what I do.} I soaked them in hot sudsy water for about twenty minutes and then I squeeze them through vigorously. I want the threads to shift and full and get rid of the reed marks. I did the same again with the rinsing. They were hung to drip dry overnight and stream pressed the next day.  

They had to have their time in front of the camera!  Both are identical in width : 13" One shrunk and came in at 61" and the other came in at 62". The hem lengths are identical and so the 'extra' is in the main body of the runner. Its hard to tweak that. 


The 16/2 mercerized is so fine and has a beautiful hand. I sett it at  36 ends per inch and its perfect


The ladder hemstitching: I used a double spacer and stitched every four threads.


The two grays work together nicely....

So they are being wrapped to go in the post and on their way to San Francisco, California. I visited there many years ago and have wonderful memories of brief time in the city. I can clearly remember our ship coming into the bay under the Golden Gate Bridge and then spending a day ashore exploring. I can remember going through the Ripley's Believe it or Not Museum, looking at Alcatraz through the viewing binoculars, and eating hot buttered crab down by the waterfront.  Great time! 

Thursday, September 5, 2013

Steady as She Goes


September is here now and it shows in the gardens and a change in the weather.   I like it... fall is one of my favourite seasons.

The studio is still busy but there is a slower pace now.  I would love to get  into weaving for Christmas but my knee says "not so fast there !"   So I back off and take breaks. If I take it easy, then I get to weave longer over all. That's better than no weaving at all.   You don't need to tell me twice!

So I multi task in the studio. Wind a warp for a spell, sit and do some paper work and project planning, weave for a time and so it goes. Right now there are several things under way.  I have three warps wound for future projects and two more to go. I'm an optimist!  There's a second scarf being woven off (on a warp for two) on  the big loom and they are coming along nicely (more on them another time...).


On the Louet Spring there is a start of an Etsy commission  for two runners. Naturally, I didn't have the colours they requested and so had to place a yarn order with Brassards.  So what you see there is the two shades of gray 16/2 mercerized cotton,  two cones of a new shade of steel gray 8/2 cotton, and some lovely deep, deep red 9/2 linen from France called "cerise"  (cherry).  The linen has already been wound into a warp and waiting its turn in the line up.  Well, I thought I might as well make the  best of the shipment. My sample book was dated 2008 and out of date so I treated myself to a new one:


Can you see the tangle of sample yarns hanging out? Its an amazing collection of samples. Best. Deal. Ever.  I use mine a lot just to compare colours and even yarn sizes. I write setts into mine and make notes. Its a work book.

My client, Jeff,  will be following the progress of his runners here so I'll be showing the stages in more detail.


Here the loom is viewed from the front and the warp yarn is ready to be wound onto the loom. Its loaded onto the back beam in a series of simple steps.


The yarn is spread on the lease sticks that support the warp and its kept at a given width by a built in raddle on the top of the loom. Once all is in place, you wind with brown paper to separate the layers. Tension is applied as you go to prevent any soft spots!


Here you can see the warp being wound on with the paper in place. My weaving readers: notice the cord through the paper roll. If you leave this in place, it can also serve to roll the paper up neatly as you weave!  No more rolling on the floor and getting in the way of the treadles...


This is the view from the front of the loom. The warp has been wound on, the warp ends released from the raddle and the ends left supported by the lease sticks. Time to thread the loom. The pattern of the cloth is shaped by the way in which you thread the heddles (or the white stringy bits) to the left. It can be simple (1,2,3,4 etc) or it can be more complex. In this case, it was a bit more involved. I'm using eight of the twelve shafts available so not too involved.


In this picture the threading is half way and you can see my threading guide where I leap frog with my post it notes to keep my place. I listen to podcasts while I work or some nice music.

Once done then the beater bar assembly is place back on the front of the loom and its time to sley the reed:


The reed does two jobs in weaving. First it determines how dense the cloth will be. This reed is a twelve dent reed which means there are twelve bars or vanes in every inch. I'm placing three warps ends through every one so my cloth will be 36 ends per inch (or epi)  Weavers keep different reeds of varying ends per inch so they can produce cloth of varying density. The reed  also becomes the beater to compact the weft yarns as we weave.

I found that I had done a double entry in one dent and so had to go back and move everything over one slot.  Tedious? you bet!  I normally take the threading and sleying slowly  and double check as I go to avoid mistakes. I'd rather catch them here then later....


Then I tie onto the front rod of the loom and weave in some scarp yarn to test for mistakes and provide my base for the weaving to come.  Here you can see my temple in place to reduce draw in already as this is rather fine yarn.


Hem allowance woven and hemstitching under way!


Once that is done, then the main pattern is under way.... I got about seven inches woven and called it a day. I uploaded these pictures and noticed something that I could not see on the loom!   Do you see it? Just to the right of the centre of the picture?  There is one slot or dent that has four threads and not three like the rest, and it shows as being more dense in that spot. While it demonstrates my earlier comment about the reed determining the cloth density nicely, it presents me with a problem. It will show as a stripe through the entire runner.

So I sat and cut out all the weft yarn and took it right back to the the start again. I'll be resleying the reed today all over again and being very careful with my counting as I go!

Tip for Weavers: taking a picture of the cloth and having the flash hit it can show you any errors you might not see. Good to know! I normally take one to show me how I started a project, so I can reverse it at the end. I also write notes on what I do but sometimes I can't read my own writing.

So, Jeff.... how did you like your gray Gothic Diamonds for the short time they were there?

Thursday, April 18, 2013

Back From Purgatory


Late last year I wove a silk scarf in this pretty eight shaft pattern and thought : "this is great! I'm going to weave something else with this pattern."  To be fair to my cranky lower back, I try to do double projects on the same tie up on the Louet Spring so I get more weaving and less tie up wrangling. 

So I got busy and wound a fine warp of 16/2 mercerized cotton (thirty six epi and roughly fourteen inches wide). Its a lovely taupe that Brassards calls Flax. The weft is a navy blue from Brassards also.   Beaming the warp went just fine, or so I thought. ( don't get too far ahead of me now) The Louet method is a snap.  Threading? no errors....sleying? well, three per dent and no issues there either.

So I wove away on what I like to call my Gothic Diamonds and there were no issues. This eight shaft twill runner was woven to fifty nine inches and it was planned to have a tidy twisted fringe and runner number two was to be woven in cream 16/2 against the flax, and have a hem allowance. One of each style, and light and dark. Perfect right? Not so fast....


I wove the hem allowance, then did some  lovely trellis hemstitching to mimic the pattern in the runner.   Then I ran of of yarn on my pirn and stopped to change to a new one.  It was a good time to leave the project for the day and I went off to make dinner. The next day I advanced the warp an inch or two and got started and that's when I noticed the tension on the right hand selvedge had softened. So I checked things over and weighted those threads and got back to the bench.  Then the left hand side went soft! What the Heck!!  I weighted those as well and wondered what was going so wrong and if I could make it to the end of the runner. I could have struggled through but the weaving looked dreadful. Fine threads are not forgiving of uneven tension and I wasn't happy either...

So next thing I knew I had scissors in my hand and was cutting away! What went through my mind was: "I do this for fun and this isn't fun anymore.... my time is more important "

Besides, once you have that first cut done....  then its really all over!

That's when it dawned on me that I had cut in the wrong place. It was only a scant 4 inches from the end of the runner that needs to have a twisted fringe. Oh, Crap!

So I cleaned up the loom and got it ready for another project. I did give the loom a good check up to make sure nothing was out of sorts but it seemed fine. I put it down to problems during beaming the warp. Subsequent warps have been fine and I've been paying better attention when loading the loom. I guess I got a little sloppy or something!


So this is all that's left of the second runner. It's become a sample stored in a binder, complete with draft and notes on the whole fiasco. If you look at the second picture, you can see the hem allowance on the right...hemstitching... then notice how the selvedge starts to go wavy with the tension problems!  If it can't be a good project, then it can  serve as a horrible warning not to get sloppy with tension when beaming a warp!

The runner with its clipped  too short fringe was folded up and sat on my sewing table for four months while I decided what to do. Normally I follow through with final finishing right away, so this was a first for me. Recently, my good friend Lynnette showed a neat method on her blog for a short fringe treatment and so I gave that a try.  I couldn't get it to look quite right, so I took it all out.  Then I tried simple finger twisting the warp bouts together just to see if it could be done. Apparently, if you went slow and took your time, it could be done. So, no fringe twister... and using my fingers and it slowly come back from the dead pile and purgatory!

Actually, if you didn't know the full story, you'd never know by looking at it....


As a bonus this time, I want to show you a silk shawl I bought myself from an Australian shop on Etsy for my birthday last month. I wear it with my black fine wool coat:


If it looks like there are feathers, you are quite right....


I wear it more bunched up and folded under the coat collar so the pattern isn't so much "in your face."  I've noticed that there are a number of "wings" on television lately:  the black crows of the Night's Watch on Game of Thrones, the Edgar Allan Poe's crow connection in the Following, and the perky 'angels' in the Victoria Secret ads.  I'm so right in fashion !    But more crow, and less angel.... :)