Pages

Showing posts with label Margaret Coe. Show all posts

Sunday, January 26, 2014

It All Comes Out in the Wash...


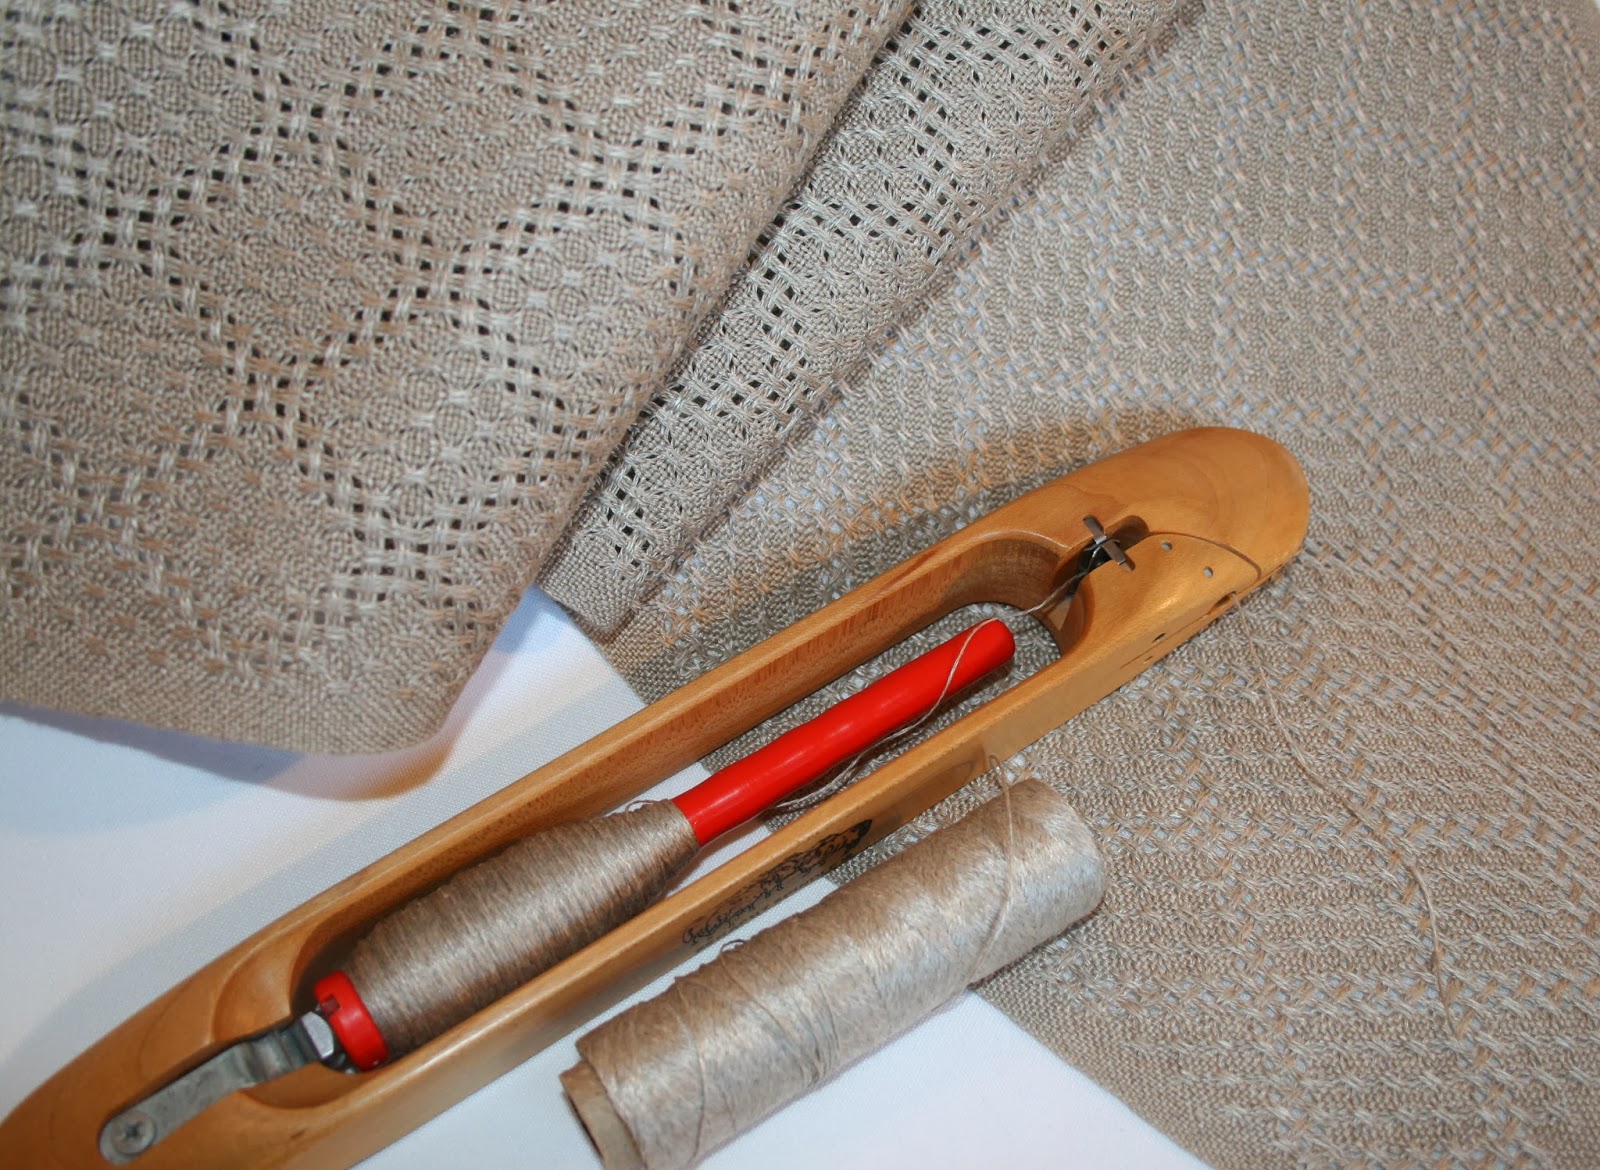
I belong to a couple of weaving groups on Facebook and 'lurk' for the most part. One smart voice there is Margaret Coe  who ably stick handles questions from newbie weavers. Some months ago Margaret recommended a neat trick for when you start a new warp off. There it is shown in the picture above and some of my more regular readers will have noticed I have been using it for the past few projects.  Its the Two Stick Start. It the best tip I have tried in a long, long time! It just works. 

The warp above is 9/2 linen, for a 8 shaft huck lace that I have tied an overhand knot every sixteen ends and then laced on. I laid in three shots of a similar sized 'scrap' yarn which in this case is regular 8/2 cotton. I beat to close the gap and then laid in three more weft shots and beat again. It closed it but there is a slight gap. There can also be tension issues until the weaving progresses further. So I placed a short lease stick into one of the plain weave sheds, changed to the other plain weave shed and placed the second stick. I carried the cotton weft up behind the sticks on the right and started weaving plain weave and you can see how quickly it came together! The sticks provide a nice firm, flat base and from the knots to the top of the gold yarn is four inches! You are off to a real good start almost right away. { ...but it didn't spare me from a denting error and I had to redo some sleying two to three inches on the far right side as I had doubled my ends in one slot.  Geesh!}


When I wound my pirns I ran the weft yarn through a clean damp cloth as I wound them. This tames the wirey linen and you can get a nice tightly wound pirn. The cloth is damp, and not overly wet so the yarn dries quickly. Once you use this on one pirn, all weft for the project must be done the same way or there will be changes in the cloth and the way it weaves up.

I wove six inches of plain weave for my hem allowance and then ladder hemstitched every four ends. I used a slippery synthetic cord doubled as my spacer.  It slips out quite nicely with a gentle tug. Next was one inch of plain weave to frame the lace, then the lace dance begins!


Last time I wove this pattern I used red 9/2 linen and used a sett of 22 epi. It was well balanced when all finished and pressed but I wanted it a smidge tighter so this time I set it 24 epi. Between the coarse linen, the reed marks and the lace five end groupings, the new cloth on the loom has streaks and lines all over the place. You can only hold your breath and hope it all comes out in the wash! (more on this line of thought later...)


I wove two runners using the same natural grayed / beige linen as weft. The runners were woven to roughly sixty inches from the end of one hemstitching to the next at the other end.  There is a small plain weave border down both selvedges and by the time you get to the end of a runner you begin to see the start of some troubled times to come. The plain weave and the lace areas take up differently as the lace centre is more textured and the plain weave is flat.  By the end of the runner you can see the plain weave edges pull down more and then curve upwards to the lace. I didn't experience this effect with the red linen runners. I checked a cone of the red today and it has a much softer touch to it. Perhaps as a result of the dyeing process?  This natural grayed beige linen has a much firmer feel to it... more wirey.  I decided to cut off the runners after each one was woven and retie back on. So the Two Stick Start got a good work out!

The third runner was understandably a bit shorter but I skipped weaving samples this time round and so that twelve inches helped out a lot. I used a snowy white 9/2 linen as my weft and it looked great! There is a nice colour separation on the lace floats so they frame the diamonds. White in one direction and beige in the other.  This type of two colour lace where the colours are more subtle appeals to me. Traditionally lace is woven in one solid colour warp and weft and usually the same yarn as warp and weft. {Beige projects are difficult and boring to photograph and if I used a lighting correction in the tweaking of the pictures, it turned all the colours really weird... so please bear up with the darker shots. I did use the camera flash and had lights on everywhere!}


I decided against using the serger on the raw edges as the serging line can be a tad bit lumpy. I didn't want that ridged line  with a flat hem. I used my sewing machine instead and did a stitched zig zag  which I think you can faintly make out on the raw edge in the picture above.  I steam pressed and measured the hem allowance. I'm going to turn it over by thirds.


The beauty of doing this with linen is that it takes a nice fold with just the fingers pressing. You can double check the measurement. I steam pressed it when I'm happy...then fold up to the hemstitching and press and pin.


As you can see by the close up above, a raised ridge line from the serger would have shown through and I wanted it flat, flat, flat!  The hand sewing was done by a running blind stitch and the three runners were an evenings work by the television.


Things started to get interesting the next morning when I filled the laundry tub to handwash the runners. The first to go in was the shorter white beige blend. I lay the runner on top of the suds and let it absorb the water. I came back a few minutes later and started to squeeze it out. I thought I could see a distinct line warp wise in the wet cloth! Oh crap....   I had used a full cone and part of another to wind the warp, but I had checked the batch numbers and they were both the same! Had someone somewhere made a mistake? I laid it to one side and then 'floated' the next runner on the surface of the water.


Look what happened below.... the side of the runner absorbed water at a much faster rate!


Even when wet there is still a colour difference between the two areas. I gently squeezed water through the cloth but did not wring it out. That would set creases into the cloth, especially the thicker hem allowance. After rinsing, I let it drain well and  rolled into a large towel to absorb the excess water. Once they were all into large towels and resting I sat and did some thinking on the situation. Two cones and two different  reactions.  I had a theory worked out.  Well, there was only one thing left to do and that was to see what happened when they were damp / dry and firmly pressed.

Here they are .... and first up is the white beige runner:


I could see no sign of any colour change! It looked completely even across the runner. This is a blend of beige and white so perhaps it obscures the issue? This one measures 12.5 inches by 55 inches finished.

So here are the all beige runners and both measure 12.5 inches by 61 inches finished.


Again, no sign of any variation in colour! Great!  So what was it?  I think the two cones, while the same batch number, there was a difference in the linen used. It would seem there was almost like a coating on the surface of two thirds of the yarn used.... and not so much on the new cone. It came down to the way the linen was processed.  I hope the washing process took care of this detail for the future. If not, there's no sign of it when dry thankfully. All the reed marks disappeared with wet finishing  and I would have to say the change in sett also worked very well. I would use this sett of 24 epi with this yarn again next time.

So now my Louet Spring is empty and I'm trying to work out what goes on next. Do you ever run out of inspiration from time to time? I know that there is a  ton of different weaves out there to try and so I just need to find one that appeals to me.  I have to clear off the Woolhouse loom and get a shorter towel sampling warp on there so there's lots of housekeeping details in the studio to take care of.   

My left knee has been troubling me and so weaving has been considerably slowed.... hence the long time periods between posts. Sorry about that but it can't be helped. I'm just happy to be able to be able to still weave!

Hubby Bruce hasn't received a surgery date as yet and as of our last check, they are now booking well into March (which is definitely not the promised January). This may end up placing his surgery and mine on a collision course later this late spring or early summer. Apparently there is a shortage of anesthesiologists.   Meanwhile my Dad is still in hospital and the news is he could be there for another week or two before being released.

I'm hoping this will all come out in the wash as well!

Saturday, June 15, 2013

Dancing to a Different Tune

For most loom owners, in particular jack loom owners, the tie up is relatively straight forward. Now if you own a countermarche loom, you can immediately double the number of tie up cords. The loom needs to have cords to both the shafts that sink and to the shafts that rise as the action of a countermarche loom evenly pulls the warp threads apart, both up and down, to create the shed. The benefits? well, usually the shed is generously large and it seems to me that you can achieve a more balanced weave due to the even tension when the shed is opened. This style of loom is easier on joints as pulleys make for a smooth action.


Above and below: countermarche loom showing tie up cords. These are not the normal cords for a CM but part of the 20+ tie up assist. You only use the ones you need but the loom is set for any and all possibilities!


Jack looms apply upward pull on some threads and the weight of the shafts lightly dip the warp threads on the bottom of the shed. Your leg provides most of the muscle to lift the shafts.

 Counterbalance looms (CB) are sinking shed looms and work best in pairs or more balanced tie ups. Weave structures such as 1/3 or 3/1 twills can only be achieved by adding a shed regulator such as the model Leclerc  makes for their  counterbalance looms.

Here's a link that will take you through the three types of looms, how they work and the pros and cons of them.

But let's get back to countermarche (CM) looms, and my Louet Spring 90 in particular!  Here she is brand new and not even her first warp on yet.


I love this little loom. It has all the pattern power that my big Woolhouse CM has but a much smaller footprint. It's an ideal loom  for weavers who have space problems or just don't want a large castle loom.  I have a 20+ tie up assist on my Woolhouse but with my front hinged treadles on the Spring, this isn't possible. The usual method for me is to lift the loom up, one end at a time (as its quite light), and set her down on sturdy plastic crates. I then sit on a low stool to work my tie up cords.

As many of you know I have some joint issues and so bending forward can aggravate the lumbar area of my back. I take my time setting the treadles cords up, taking a break and stretch, sometimes do something else entirely, then come back and do another couple more treadle tie-ups. I seem to use anything from eight treadles to twelve. If a full twelve is in play, that's 144 ties!

 In the past year or so I have been working a couple of projects off of one draft and tie up. Leaving the tie up in place and weaving a couple of different projects on the same style threading. I usually change the warp yarns and weft but use similar treadlings. I always try to find a new way to treadle and play with it a bit but I always end up becoming bored by the end of the second warp.

So with the current project on the Spring there is a twelve shaft / twelve treadle  tie up and it looks like this: *Be sure to click on any image to enlarge okay?*


As you can see this tie up when treadled in a straight run produces a nice twill line. The longest float is three ends whether warp or weft.  I got thinking this over and decided to play around with my weaving program and  plug in this tie up and then see what happens when I enter different threadings.   I can recall some weavers when I was a newbie telling me they had the same tie up for years. They couldn't all be weaving the same thing all that time (or could they??)

I had some interesting finds!  The "old tie up" shown above does change some things about various drafts, but its actually an improvement in some cases, as you'll see from the examples below. 

Now, some weavers, usually newbies,   like to follow 'recipes' and are comfortable with this. Then some weavers eventually look at a recipe draft and think to themselves " what would this look like if... or how can I change this bit..." and start playing around with the draft.  They go beyond changing colours and setts. Fortunately computer weaving programs now make this so much easier to do over the old pen and paper varieties of only a few years ago. There are a number of them now and many are listed in the back pages of your Handwoven magazine. Weavers can eventually progress from recipes to working up all new designs as they become more familiar with the weave structures and their 'rules of engagement' and their own personal confidence level increases.  Oh, there will be mistakes and some dubious choices, but those are how you learn. I still make them all the time :)

So if you already have a weaving program, or download a free demo, then you can try this yourself ! (Maybe this post will encourage you to consider purchasing one.)   I personally use Fiberworks PCW Silver Plus.  The 'plus' includes loom drivers for the Megado loom, so most new to intermediate weavers would only need the Silver version.  Let's take a look at what happened with some of the drafts when I combined them with what I like to call "the old tie up".

First I looked through my collection of drafts and found this:


This Gebrochene and Hind und Under and its a complex twelve shaft pattern. It would make a stunning table cloth if traditional linens were used. I made two projects using the same tie up.


...table runners in mercerized cottons


and tencel scarves.

So what happens when you change the tie up but keep the threading? You get this:


It still keeps the basic pattern but is now actually more defined. I like it!

Okay, so how about this draft:


This is an M's and W's design...another twelve shaft design, given the old tie up I want to use.  So I replaced the tie up with the existing one on the Louet Spring and it now looks like this:


I think this version is nicer than the original and I think you can expect to see this on the loom in the near future!  I couldn't find my twelve shaft snowflake twill but more or less know the theading by heart and so I made this draft up:


Again, this has the requisite tie up and I think it looks rather neat.  The stars will weave up quite large so I'll have to think about what the project will be. Runner? Shawl?

Are you starting to see the fun that can be had playing with the program?  It helps create new possibilities and with the confidence boost, you'll even start creating your own. 

Note that these drafts are all "woven as drawn in". There are even more variations possible if you change the treadling and play around with that portion of the draft!

Let me show you one more. This is a variation on a point twill and its treadled as its threaded. This draft has the tie up I want to use again.  


I call this one network diamonds as it looks something like that to me.  As you can see, the threading isn't overly complicated, the tie up is straight forward and yet the pattern is very interesting.

You can play with the program and add in border treatments like so....


What did I do to the draft? well I added another repeat to balance the pattern. That took one click, then some deleting to remove a portion of the repeat. Then I added squares on the right hand side so I could add three straight runs of one to twelve. I added the same to the left.  Click save. Then under 'weft' in the menu I clicked 'treadle as drawn in'....there is three straight runs at the bottom but there was no room  to include them unless I made the draft even smaller and then you wouldn't be able to see the details. So now the draft is balanced and has borders.   Need it wider? add another repeat or two...  We haven't even  on touched colours yet!

Some of you who like to use recipe drafts?  well here's how to start to modify them. I found a pretty draft in Complex Weavers Greatest Hits book called "1836" and once again I replaced the tie up. I appreciate this is a small image but you get the over all idea of the pattern. 


These are some of the designs that will appear in coming weeks and months, and maybe more, as I play with this idea some more! Like I said earlier, this doesn't include changing the treadling and playing around with that aspect.

Now, in a similar vein to the current topic.... there's new book out!


I belong to some weaving related groups on FaceBook. One is 4 shaft weaving and the second is 8 shaft weaving. One contributor is weaver Margaret Coe.  Margaret has been working on a book  called "4-8...Weave" (you can find more information on it here)  It was just released this past week and I have my copy in my hands.

I must be honest and say it only arrived yesterday so I haven't had time to go through it page by page as yet. What sold me on this book was Margaret's description of what she was trying to accomplish by writing it.  Basically, when you purchase a weaving program, and that's any of them, they provide you with a manual or help files that tell you how to utilize the program functions. How to navigate around and pull down screens etc. 

They don't tell you how to use it to be creative and actually make designs!

Margaret takes a weaving program, and in this case Fiberworks PCW Silver, and uses the computer program functions to show you how to use them to design and get the most from the program. She emphasizes that these techniques can be used with any of the programs out there on the market, many of which have free demos to try out.  It focuses on four shaft and 8 shaft drafts but these can easily be expanded to twelve, sixteen etc.  There are tutorials on snowflake twill, polychrome, interleaved, block substitutions- crackle, and more.  There are colour  pictures and very clear diagrams and screen views. I opened at any page and snapped a picture ( and I hope Margaret doesn't mind!) I plan to review it again once I've had time to work with it.


I was happy it arrived in time for this post on 'dancing to a new tune'. If this sort of design work interests you, or you want to learn to use your weaving program to its full potential, or maybe simply change up recipe drafts and personalize them then hopefully my post will encourage you!


On a personal note:
I saw my surgeon about my left knee and the short answer is, he wants me to wait some more. So I go back again in September and we'll take it from there. Apparently this knee replacement is a tough one to recover from as where the surgical scar is, is where you need to bend! There is much more pain after then with a hip replacement.   I reminded him that I'm a weaver and I'm not stopping weaving.  So, I'll continue to weave on, albeit more slowly. If anyone reading this is a weaver and has a knee replacement, I'd like to talk with you. My email is in my profile.

With my old legs slowing down, apparently my grandson Ethan is starting to use his and is now walking and most likely running!   Neat circle of life huh?