Pages

Showing posts with label wet finishing. Show all posts

Monday, April 10, 2023

Silver Linings ?

 I just got up from the loom where I have made a small, slow start to resuming weaving again. I'm at 30 inches on a scarf on the spring loom.     'Small and slow' as I really do not want to wake up the dreaded lower back and go back to the spasm that had me in its grip and laid up for the past few weeks.  Better to let it get used to weaving and build up some strength.     

In some ways the time off was good and allowed me to deal with other things that have been waiting for time. I sorted my hand spun yarns and ran them through a yardage counter and so have a better idea of what is there.    A time was spent looking over some of my tools and I have parted with some shuttles.  They were lovely, but unused so time to find someone who will appreciate their virtues.

I'm the Guild of Canadian Weavers Test Administrator and this is the time of year when I am the go between for the candidates and examiners.   So its a busy time and it will be ongoing for at least another 3-4 weeks.  Best of luck to all the candidates !

Another benefit of the time off is that you are able to reset your goals and decide what you really want to do with the time at the loom.   It can get to be a bit of a treadmill with continual projects and production and that can get old quickly.   So a lot of thinking happening on this subject.     I've had to readjust physically as I have gotten older and with arthritis and joint issues, but it also makes sense to readjust mentally as well.

This project I'm about to show you is one I had high hopes for and it fell short.   Oh, they still look nice and I have no regrets about weaving them but they are not in perfect order  due to some issues. They are up for sale but as 'seconds'.  


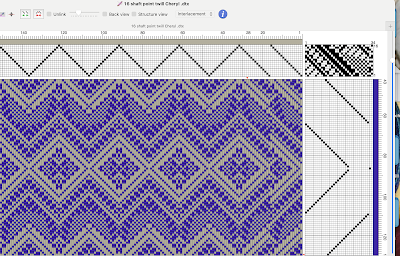
The draft is a 16 shaft point twill that I admired one time and the weaver, Cheryl B. sent me the WIF file some years ago.   I set up the Megado with 10/2 mercerized cotton in a colour called 'shell', a sett  of 28 epi and I planned for three runners. I wanted to do up nice depth hems with ladder hemstitching so they could be displayed either side.


The pattern is quite ornate and busy and so I chose more sedate colours to fit any decor.  It would be great with bright bands of colour and  take on a festive look but that would be for a future project.   This weft was slate 8/2 tencel.


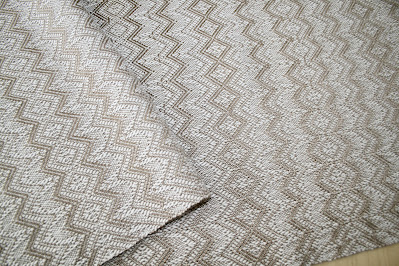
This is the back view as marked by a maker's tag.... more on this in a minute. The finished size on this runner is 16 by 44 inches.


The next runner was also 8/2 tencel weft but this time in taupe.   I quite like this colour and this is the front view....


... and here is the back view.....


Maker tags went on all the back views.


Here you can see both sides together. It would have been nice to be able to pick which side you like better ( and maybe for some person, they still will.)   This one measures 16 by 43 inches finished.


The third runner was much longer at 16 x 71 inches but I wanted a cloth for a larger table or armoire.  This time I used 10/2 mercerized cotton in a colour called 'sponge' ( darn silly name!)   Its a light silvered green and quite pretty.


Front view and as you can see, its long! I laid it out lengthwise on our long table but it looks boring as heck. I did my best with lighting  but.....  here's the back view:


A close up of the hem and ladder stitching  which I enjoy doing. Good thing too as it take a long time !

There appears to be a line warp wise on the right side.... but its an illusion.   No threading error but where three ends were sleyed together right at the point and stayed together !

So what went wrong?  Everything appeared fine when I took them from the loom but when I flipped them over, random rows on the back side had skips.  Sometimes not all the way across, and some times over so many inches. Not sequentially like a treadling error.   That I could blame on the Megado's  compu-dobby but not this time.

The front look just fine but on the reverse there were these random skips.   The sett and my eye sight meant I wasn't the least bit interested in trying to needle weave a fix. That, plus the many rows that needed to be done never even made that an option for me.

So I folded them up and they sat in a 'time out' pile while I thought things through.    Eventually I decided that they are fine if you view them one side only..... and be honest about the flaw.    Not everyone is  obsessed with perfection as some weavers are. (Yes that was hard to say as test administrator!)


So what caused this issue?   I found myself giving the loom side eye and not feeling the love anymore.    Which is silly as its a tool, a great big tool and issues are either mechanical or computer related.    The pattern of skips were too random to be a computer glitch so I started to look at mechanical issues. 

It took some time but I found it.  The shaft cords on the Megado look like a wall of cords as the shafts are all close together but when you look closer you see that the texsolv cord comes down and sits in a little slot at the end of every shaft, on both sides.  A couple of the shafts had cords that sat outside the slot.   Its hard to see unless you are looking for it.... and I know that I will never forget to check ever again!   The cord is needed to fit in the slot to ensure the shaft lifts up and sets back down again smoothly.  Not in the slot means the shaft can float by about 1/4-1/2 inch and so the shuttle skips some threads.    I have always made sure the extra heddles don't bunch up to prevent floating shafts and I arrange them alternating brick style.    During threading you can be  pulling and tugging at the shafts and heddles and I guess they slipped out.  Its a wonder this didn't happen sooner in my 9 years with this loom. 

Always something new to learn and I think I might work up a check list like an aircraft crew works from and tick some  'take off' boxes for future projects.

The runners are hemmed,  pressed and looking fine. They are fully declared as seconds and being sold at a reduced price. Someone will love them just as they are.   

A final note:   I'm hearing that some weavers are more or less tossing their new weaving into the washing machine and dryers,  or sometimes just smoothing damp and wrinkly and letting dry overnight.   This will deep set the wrinkles into your cloth and its just about impossible to remove them.

Even my kitchen towels, that eventually go into the washing machine and dryer, start off by being hand washed and line dried over a rack.  Then, while still slightly damp, they are pressed smooth to set the threads into their final positions.   What a weaver does in the finishing stages is nothing at all like an end user will do going forward.   Its a stage that is as important as the planning and weaving stages and all the other steps in between.    If you are serious about making beautiful cloth, then get comfy with hand washing and your iron.  It makes a world of difference to your presentation !


16/2 cotton & 40/2 linen, washed and pressed!

Saturday, October 1, 2011

Done Like Dinner

My bright idea of getting some more mileage from tie-up's on the Louet loom were brought about due to a cranky lower back. A great idea in theory! I would do one project and tie-up and then go looking for another, usually modified, project and use the same tie up again. When you come to think of 12 shafts and 12 treadles and 144 ties, it's a reasonable concept!

The book mark project was the instigator (see picture on head of blog!). I played with the draft in my PCW Fiberworks and changed a few things. Here it is again:


I had two ways that I liked to treadle them. One as shown and the second is to add the diamond and a half between repeats. Okay, so two scarves! I beamed a 10/2 tencel warp at 28 epi. I have more details on this at this post.  My weft was uber fine 30/2 black silk and one full repeat was a lot of treadling! I recall the first scarf progressing well and no difficulties but things went far slower on number two!  The  floating selvedge edge thread on the right hand side kept letting go and breaking every six inches until I finally accepted it was going to happen regardless and kept the T pin handy. My final fix for this was in my last post. My problem was boredom!  The book marks had been quick and fun but this was dragging for some reason. I found myself avoiding the loom and weaving more on the blue and white towels! (they are coming to a conclusion soon... patience grasshopper!) I did force myself to sit down and weave so many repeats before I was allowed to weave on the other loom.... and when it seemed like I would be having a student come soon and use the Louet, I got busy and wove the last portion and got started into the finishing. The loom sits empty for now now... geesh!

I had difficulty getting decent pictures for you as the scarves are black and a deep red, with a silk weft which all reflects light when my flash goes off! So please bear with them ... trust me, these are the better ones!


Here they are on the fringing board. I did a nice firm, rounder three stand cord using my triple twister. Twisters make the work go so much faster! Next up, beading and bling!


Click to enlarge for better detail. It took me a pleasant two hours yesterday to do the four scarf ends and then I lay them and my samples to soak while we made our dinner.


Since our summer seems to have moved on, they hung for the night in our shower stall and then out came the ironing board this morning!


So with diamonds in between repeats.... (wow, great sheen on that silk!)


... and without! There was just one complete box or square to start and finish and the rest was all undulating pattern repeats. They are not as shiny in person as they appear here. I'm an automatic 'point and shoot' type so the more technical side of all things camera are not my forte! The scarves are now tucked away with the rest of my inventory for the coming sales.

With those sales in mind, I did something special to get ready. My very first professionally made business cards!  They also serve as my hang tags so there is a small hole punched in one corner and care instructions on the back. 


The image is  the echo weave scarf I wove using Lynnette's unique computerized draft.  The first cards I didn't make on my little printer with little perforation marks all around the edges! 

Saturday, January 15, 2011

Patience is a Virtue

Thank you for patiently waiting for something weaving related. My back is slowly improving and I'm able to do more, but that's the rub! I have to resist doing more and setting myself back. I'm happy to pass on vacuuming but I now seem up for other duties.

I have been asked by a friend to share my hemming techniques and so along with the final unveiling of the guest towels, there will be a step by step details of what I normally do when finishing off towels or runners.

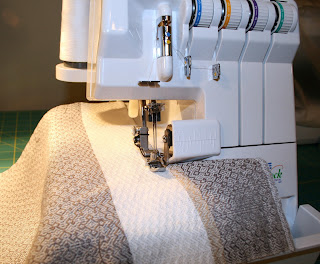
Once the warp come off the loom, I fire up the serger. (If you don't have one, then a straight stitch on the sewing machine will do. Just adjust the stitch length so the warp ends are all caught and held in place)

In the picture above you can see the towel on the left with its white hem allowance, then there is a narrow stripe of my scrap yarn, followed by a very short section for samples. I was able to squeak out one more towel, so sampling was reduced to a brief showing  :)   It might be small but it is all you need!

Here they are all cut apart along with my four little mini samples. Next step involves the ironing board. So please excuse the nasty cover as I'm finding it difficult to get a replacement cover for the wider Rowenta board.
In addition to my Rowenta steam iron, I use a small slide ruler sold at fabric stores, straight pins. I firmly press the towel and then measure the hems at both ends to ensure they are the same length. I divide the depth of the hem by three and  make the first turn.

Then using full steam and a heavy hand, I press it *firmly*. I fold the second turn and ensure it carefully follows the bottom edge of the hem stitching and then *firmly* press again.

 
In the picture above you can see the folded hem (shown front side up) and ready to be stitched. It stays put after the pressing but I do add some pins to keep it in position during its move to the side table in the living room.

It took a bit of time but all twelve towels finally were turned and ready for the next phase. I was getting a lot of couch time recently  and so having these to work on was a nice break!  I really enjoyed hand sewing the hems and it seemed to help me feel useful and still working on weaving how ever thin a thread!

I like to use quilters sewing cotton. Its a bit heavier than the polyester thread and less likely to twist. I also feel that I wove a natural fibre towel, so use a natural fibre thread to finish it. Above I'm drawing the thread through the Thread Heaven to reduce twist and improve the movement of the thread through the cloth. It seems to reduce 'tug'  if that makes sense!

I always start at the side fold....

I don't like leaving the side fold open. It leaves the door open for the handwoven fabric to unravel and trail ends out the side and generally look messy.  If there is a little of the first cloth fold pushing its way out of line, then I will ease it back into line using the needle.

Once its in place, then I pinch the whole thing with my fingers and start in the end of the fold. I want this part to lay flat so I sew back and forth straight through the cloth.


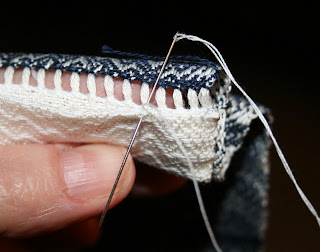
Then once I get to the main part of the hem, I switch to my running blind stitch. (I think its called this)

Running the needle through the hems fold to 'hide' the thread and at very short intervals, you pop up. I make my stitches very close together as this will be a towel that will be machine washed most likely. I want it to last!
Then you slip the needle through a weft thread or two and through the leading edge of the hem and pull snugly but not so tight as to misshape the appearance  in the front. Slip the needle back into the fold and move along. That's it. When you get to the other end, you move down into the side fold and flat sew that closed as well.  The pictures above show the non-fancy hem. It works the same for the fancy hemstitched hem allowance too.
The space between the ladders is clearly where you run the thread in the hems fold.  So what do I do when the sticky out bit at the side is too large to push back into place with the end of the needle?  While I'm not sure if this is the right way, it is what I do....

I gently snip off a portion with sharp scissors, then ease into place with my needle and then flat sew it with extra small stitches to keep it firmly closed!

Sorry for the wack of photos but I feel they can show you the process better than I can explain it. It's certainly not complicated and you should have it worked out after one towel. Feel free to adapt to suit your needs and please share with newbies.

So to review:
  • press firmly into thirds with a heavy steam iron
  • use small stitches and take your time
Do I ever machine sew? yes! I use it on towels that will be tossed into the wash regularly and doesn't have fancy hemstitching. Sometimes I use hand sewing when I don't want an obvious stitch line  running across the cloth as it is visually distracting. So I started out as a new weaver wanting to machine sew everything and slowly over time I have moved more and more to finishing by hand for the obvious benefits it provides of being as secure and  less obvious. It does take time to do this work but after what you have already spent winding your warp and weaving, its not a lot of extra time.

Next step is to wet finish them!    I placed them in the washing machine and set them for delicate. When they came out I took each one in turn and worked them between  my  hands and pulled them into shape and and then lay them flat on towels  and  left them for a couple of hours to absorb moisture.

Back to the ironing board... same disclaimer as before :)    I pull and shape the towels giving particular attention to the edges near the hemstitching as it can draw in here. I carefully snip off all weft tails and fire up the iron. Since they are already damp, steam isn't required this time.

I press very firmly!  I can lower my board down a bit to make applying pressure from above easier. What we are doing here is to set the threads into their permanent position. Even if the next owner of these towels opts for pressing, they will never need to be done like this again. { Not all weave structures need this or should be ironed this way... its a case by case choice. These are woven with fine smooth threads and reversible pattern}  I'm already whispering about needing a small steam press like Lynnette has for my birthday... wish me luck!  I see the store she bought it from doesn't have them listed anymore!

Once the towel is well pressed front and back, I like to fold it into thirds lengthwise, pressing as I go.  I'm one of those weird people who actually likes ironing!   I'll have to show you my 1950's rolling press some time I scored a few years ago.

Here are the towels with 16/2 beige mushroom weft. Two with ladder stitching and the top one with trellis style. Here's a close up:

Then there's the bronze gold bamboo 8/2 weft:

I had some pumpkin mercerised 16/2 from a friend many years ago:

There were some done in a gun metal gray in 16/2 mercerised cotton:

I also tried an experiment and I'm still trying to decide if I like it. Hub says he does...

That one Maltese cross on the left looks darker than the others but that's just an optical illusion! The body of the towel was woven with mercerised 8/2 cotton for a play of light on white.  I had to be very careful when weaving not to lose my place as I would never have worked out where to unweave back to!    So they are done at last and what was 8 yards felt more like 16! The hemstitching took a lot of time but I really think these turned out nice and I would be proud to give these as a gifts.

As a bonus for reading this far, I have included here all details of the project plus a copy of the draft. The basic draft came from A Weaver's Book of 8-Shaft Patterns by Carol Strickler and I modified it slightly from there.  Click to enlarge the draft or any of the pictures in the post.


Maltese Cross Project


WARP DESCRIPTION
Warp Yarn: merc cotton
Count: 16/2
Color: cream
Cost, source: roughly $7.95 per 250 gram cone; Brassards, Quebec
Warp length: 8 yards
Warp Width: 13.42" at the reed
Set: 36 epi
Reed: 12 dent
Sley: 3 per dent
# Ends: 484 plus 2 floaters

WEFT DESCRIPTION
Weft Yarn: cottons (various) bamboo
Count: 16/2 and 8/2
Colour: white, gold, navy, mushroom
Sources: mainly Brassards

Pattern is taken from " A Weaver's Book of 8 Shaft Patterns" by Carol Strickler
Page 89, 323-4

Project Length:
19" per towel (4" for hems+15" main part of towel)
x 12 towels
-------
228"
12" samples
15" take up
----------
255"
20" loom waste
-------
275" divided by 12 = 22.92' divided by 3= 7.64 yds (rounded up to 8 yards)
~~~~~~~~~~~~~~~~~~~~~~~~~~~~~~~~~~~~~~~~~~~~~~~~~~~~~~~~~~~~

Project Width
each pattern group =27 ends x two=54
54 times 8 repeats= 432 ends+ 27 1 repeat to balance+ 24 ends borders= 483
Plus 2 ends for floating selvedges.

Warp wound in two bundles of 242 ends each.
Beamed onto Louet Spring.
Various hemstitching to tart the towels up!