
I have suspended the lease sticks from the looms upper frame and pulled the warp forward:


 The first picture hows where I have arranged the heddles into the given pattern from my draft. In this case, threading is shafts 6, 7, 8, then 1,2,3,4 and the last group is 1,2,3,4,5. Shafts six and seven are my black ends and the colour is the balance. I'm lucky that this pattern has clear threading groups! It's not always this easy. I always use a slip knot to hold each group as if there is an error such as too many or not enough ends, it's easy to work your way back to find it.
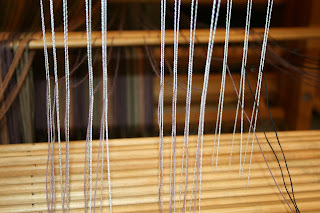
 Okay, now it's time to thread or 'sley' the reed. I guess there's an interesting story behind that terminology! I like to spread the warp ends and divide them into the groups needed for the reed, in this case 2 ends per dent of my 10 dent reed as this is a 20 epi project. I take my time at this stage, or any time of the warping process. I'd rather do it right the first time and get on with weaving over corrections! I have nice music on or my fav, CBC radio. I'm becoming a fount of knowledge as I work away.


 I recommend using a slip knot into each grouping as you sley! It's so darn easy to have someone come along and give the beater a good swing and out they come. That's called a 'do-over' :) Next step is to divide the warp ends into groups. Smaller ones are better and I normally do half inch sections or bouts. Since we are not tying onto the apron bar, we are lacing on, use a small over hand knot to secure the ends of each bout. Comb and tug to make sure that all ends are evenly 'tight' before doing the knot. Lacing on means that we reduce the loom waste of this project and I prefer to use that additional warp (plus some budgeted extra) as a time to 'play' and do some samples. These I share with a group of friends. More on this at another post.


 Once the lacing is done, I apply a bit of tension and then start pulling on the lacing to pull out any slack and gently work my way to the left. I have the end taped down on the beam and re-secure as I keep working out the tension until even. Be sure to have the edge threads evenly tensioned as well. They can be a tad slack but you can always tighten by moving the laces. It sounds silly but I like to close my eyes and run my hand over the warp bouts and 'feel' for the soft spots. Eventually you get an experienced hand and find them. Once you are sure that everything is even and good, secure the end and I use some tape for good measure! (love that tape!)
Tie up time....or in this case, to the back of the loom we go. Time to show you how that fancy smancy tie up system works.


 The first of these three pictures shows the cords in the peg board all slack and the treadles are on the floor. I choose the centre 8 treadles and pull the cords as per the tie up draft. The second picture shows where I tied up the o's to the upper lamms, and the x's to the lower. Only one tie is needed per row, leave the other one slack. Last picture shows the tie up in place and we're ready to pull the locking pin and start to weave. But that's for next time.... sorry to be a tease!
(I had all my lights on and used a flash, but sorry if some of these shots are a bit dark....)
2 comments:
Very lovely warp, Susan! So how do you like your "fancy schmancy" tie-up system now that you've had a chance to use it?
Hi Louisa,
I like it very much! I have used this for about three years and it's fantastic as opposed to crawling on the floor. The 'refit' was to try out some portions of it being metal airline cord, which didn't work well for me. I took time to set it back to all texsolv cord 'cause I know that works.
This tie up took me 5-8 minutes to do. ( 8 shafts and 8 treadles)
Neat huh?
Susan
Post a Comment