Pages

Tuesday, July 9, 2013

Road Trip: Friends and Family


Sorry to leave you waiting for so long! That last overshot post should have kept you thinking for awhile at least. I have been away on a road trip to visit friends and family..... and I just couldn't bring myself to announce here at the blog that we would be gone, leaving our house empty. Being a policeman's daughter, I'm cautious about such things!

After packing and making up dog dinners for Calli's time at the doggy resort, we started our trip with this view:


These gals were waiting in the ferry line up to cross to the Vancouver side!  Soon we were all aboard and on our way. This is leaving Nanaimo:


We had a grey start but these clouds soon cleared away and we had sunshine. Also the start of a high pressure that was to bring hot weather to much of our area. Our air conditioning in the car couldn't be fixed as they couldn't find the leak.... this could be a problem!

We buzzed through the Vancouver area and out into the Fraser Valley. We were heading to Merritt the first day so we had a great drive. Once past the town of Hope, we were into big mountain country and a section they call avalanche alley. While I've showed you pictures from there on last years trip.... here are some fresh ones:


Mt Yak


Not sure of this one's name but its across from Mt Yak

After a few hours we reached Merritt


After a pleasant evening there we headed out to Kamloops and found this lovely view from the hillside east of Merritt of the Nicola Valley.  This is sage brush country...home to logging and cattle ranching.


Kamloops is also a hot and dry place but a confluence of highways, rivers and quite a boom town! We stopped here for breakfast at a Denny's east of town and I snapped some pictures of the hoodoos they have all along the river. I tried hard to get the three dimensional feel of them and all the benches. Tough when you are a basic point and click shooter!


They are really beautiful and reminded me of our visit to Dinosaur National Park near Brooks, Alberta in 1993. If you are ever near there, you *must* see it!

After Kamloops, there are small little places along the road: Pritchard (Hi Wendy!), Chase, Sorrento, and Blind Bay. We used to live in Blind Bay and we just had to cruise by the old house:


The trees are larger, fuller and the place looks nice. Yup, we should have stayed there.... oh, well! Too late now and too much water under the bridge. (I'd cut those cedars back if it was mine still)

We arrived at Gudrun and Alfred's place in Tappen just after lunch. They live at the foot of Mt Bastion, across the Shuswap lake from the city of Salmon Arm. Their little community of Sunnybrae is beautiful and a real slice of paradise.  Gudrun had some of her weaving on display at the local art gallery and the day we arrived was the last day of the display, so we had to go and see it!  Now there was weaving by three other weavers but unless you had their express permission, you could not take pictures, not even a over-view shot from the doorway!  So it looks like a one woman show as a result.


Gudrun with her metal sample loom. Her Jacquard woven yellow sunflower weaving in behind.


Beiderwand table cloth with Pine Tree Borders


Interesting bit of history associated with this one!


We posed for pictures: Elizabeth (Shuswap Guild President), Gudrun and myself.


Gudrun played the grand piano (she is a lovely pianist!)

We left there about 3:30 pm and had some time so we visited Lori Talerico's Fine Art Gallery nearby. What a delightful little gallery! Lori has so much talent and when we arrived she was working on a 'caustic' painting (I think that was her term) Its where you paint and then apply wax over top, more paint and then more wax and you build the painting up in layers. The finished result has a 3D look to it. It also means using a heat gun to melt the wax and given the ongoing heat wave, Lori is truly dedicated to her craft!


Alfred enjoying a coffee and some of Lori's art.


Then Lori and I realized that she had bought one of my shawls a few years ago and agreed to model it for me! My first "post purchase" picture. I usually never really know where my weaving goes after it leaves my hands so this was neat for me! 

Next up, we went just a short distance from Lori's gallery to the lake foreshore and Alfred and I sat in the shade of a tree and admired the view:


Shuswap lake and Mt Bastion is to the right of the picture. Gorgeous huh?


Bruce and Gudrun walked the pier.

At 5 pm we went into town and met Shuswap Guild friends for supper. What a GREAT time! I was hugged so much and it was nice to see them all. Given it was a long weekend, it was nice of them to take time to come and see us.  


Meet (left to right) Elvi, Judith, Gudie and Julia. Elvi is a beautiful weaver; Judith a spinning instructor, Gudie is the Queen of Recycling Fibre (and yarn bombing), and Julia is an accomplished fibre enthusiast, and woodworker. She usually plays a harp every Christmas at the annual sale that she made


This is Darlene with Gudrun. Darlene is a sweetie and also a beautiful weaver/ knitter.

We spent the next day quietly at Gudrun and Alfred's home. Gudrun and I discussed all things weaving. She has two studio rooms: one for her antique Scottish loom and the other is for her tapestry loom.


Tapestry loom with new project under way! This will be revealed here in the future when its all done. Trust me, its very unique! On the wall to the left, a tapestry called "Night Migration"


Here's all the shades of grays being used and all fibre types depending on the effect Gudrun wants to achieve.


The light from the windows make getting a shot of the front difficult but you can see the fly shuttle boxes.


Its an amazing loom and built in 1932 or so.

There is weaving all over Gudrun's home: rugs on floors, tapestry on walls, table cloth on the dining room table along with placemats and napkins. Even new upholstery fabric on their Ikea chairs! Its really a weavers home and every room had something special.


Transparencies hanging in the stairwell...


...and the most amazing overshot coverlets on the beds!!
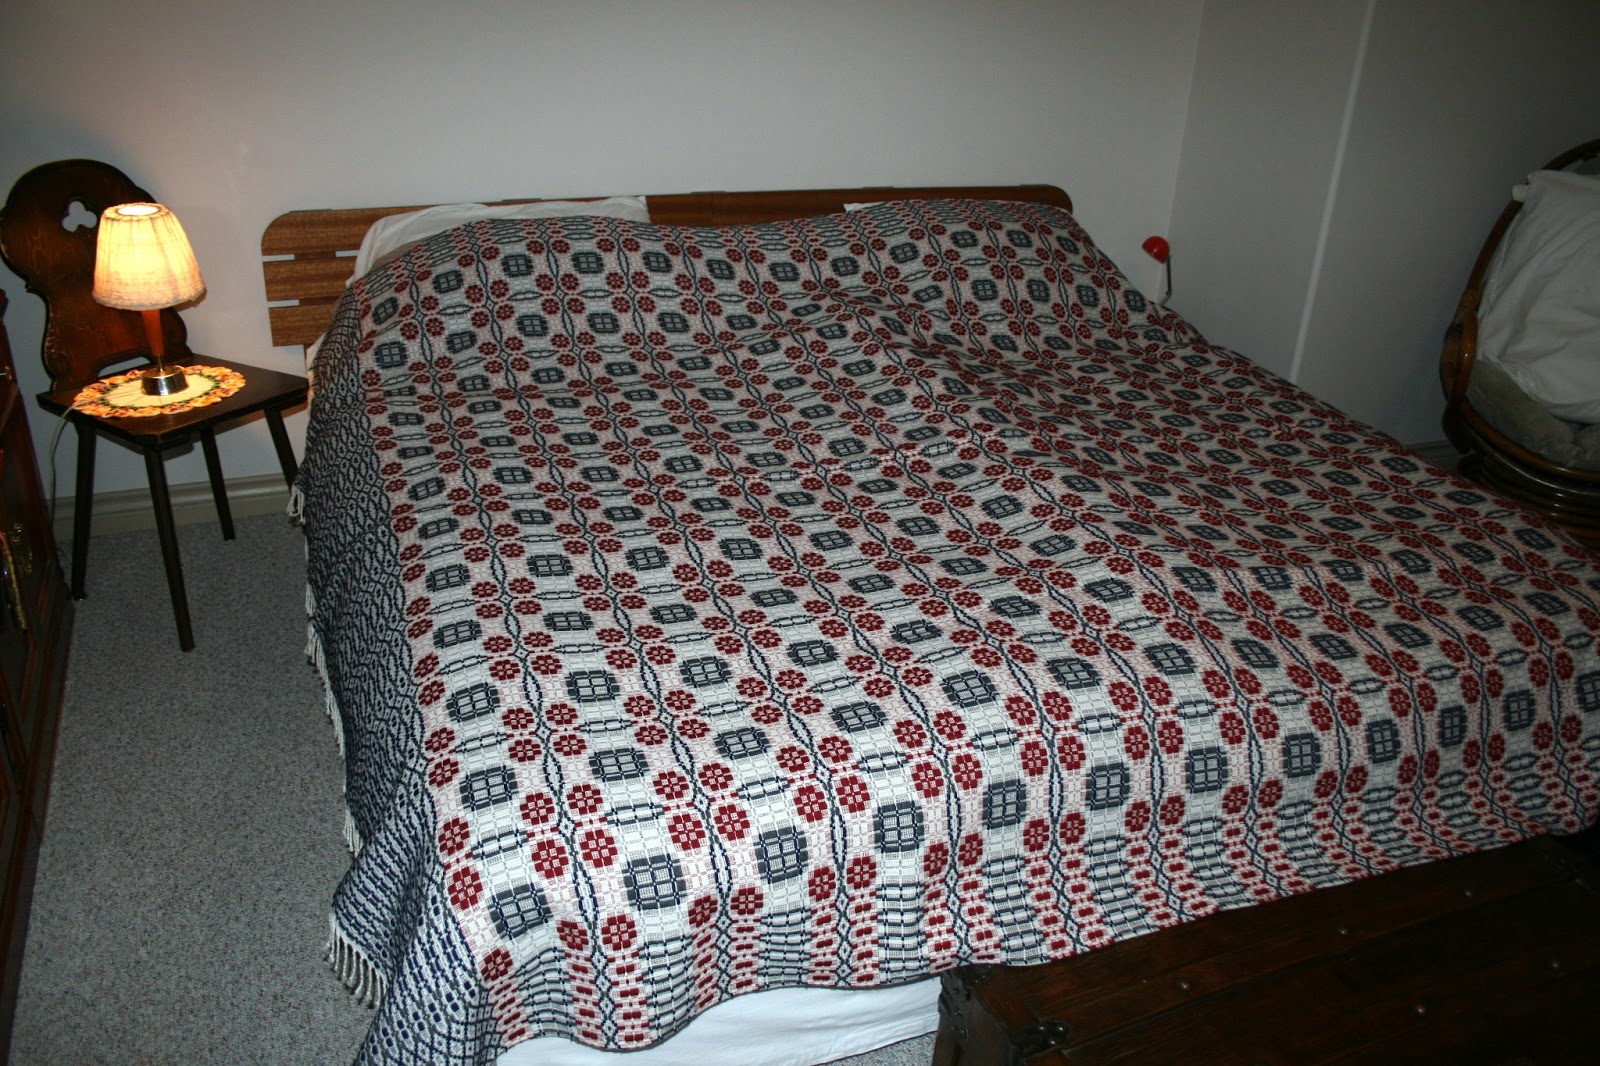

This was our bed. It was woven in two pieces and sewn together. It takes a careful beat to get two sections to match up and trust me, they match! (on both coverlets)


After my last post on overshot, this was a real treat to find!


We enjoyed the cooler evening air on their deck with this stunning view of Mount Ida and the city of Salmon Arm along the shore of Shuswap lake.

Next day we headed off down the road and drove through towns like Enderby, Armstrong, and Vernon:


Swan Lake north of Vernon


Coldstream Valley


The beach at Kalamalka Lake was full of people trying to keep cool!


Almost to Kelowna!


and then we arrived in Kelowna to visit Bruce's mother. She was celebrating her 90th birthday! By the time we arrived, the heat had me all done in. It was reaching 38-40 degrees Celsius and I'm used to a more sedate and cooler 20-22 degrees on the Island.  A cool shower and some time in the cooler basement and I felt better!
We stayed with Lorraine for three days and before we knew it, we were on the road home again. We weren't too far along on the highway between Kelowna and we came across these beauties browsing along the highway near Pennask Summit:


The scenery between Kelowna and Merritt on the "connector". Rolling hills...


Then back through Avalanche Alley....


This rock cornice looks menacing...especially when you look at the slope below it!


The fresh green growth is where previous snow slides have taken out the trees. We try not to travel during the winter months and that starts in late September way up here.


Finally we arrived in Vancouver!  We stayed overnight at the Sheraton and I upgraded our room as a special treat: king size bed on the top floor, free internet and wifi, free dinner appies and a free full breakfast. Best of all, air conditioning!! It was the crowning touch to a great week away!

Then we were looking at this welcome view.... That's Nanaimo in the middle there and home is forty five minutes away. Oh, and the heat wave eased off once we got in the door.


Tuesday, June 25, 2013

Overshot~ From the Past to the Present

 Grab a coffee or tea... this one is long!

When I say overshot, what comes to mind?

Is it old Colonial blankets, usually white background with blue, black or red wool pattern and large, large designs?  A corner box with the weaver's initials and a date.They bring to mind an image of early residents of colonial America and also the British Colonies, later to be called Upper and Lower Canada.

They were functional, practical and pretty.  They could also be made entirely in the colonies with materials to hand.  We use cotton for warp today but some early coverlets had a fine grist plied lynsey-woolsley for warp.
I'm not going to delve too deeply into the history of Colonial textiles here today but if this topic really intrigues you, then I recommend this book: The Age of Homespun: Objects and Stories in the Creation of an American Myth by Laurel Thatcher Ulrich.


It mainly covers  the American colonies, but shows the importance of textile manufacturing to the colonists and the value of their tools and equipment. They were listed in household estate accounts as assets  No new bride could be married without her dowry of spinning wheel, loom, shuttles and such. These tools were passed down from one woman to another, but always listed as belonging to the husband or the master of the house.

It is thought that overshot was brought over from Europe with the early arrivals to the New Land. Settlers brought many ideas and tools with them and adapted them to the new life here.  With a colder climate and long winters, overshot blankets meant you had a thick stable cloth, woven on four shafts, that kept the sleeper warm and also served as a decorative bed covering.

If the topic of these historical coverlets interests you, then I recommend the amazing twenty five year study by Helene Bresse:  The Coverlet Book.   There is a good review of these two large volumes at the link.


I bought my (heavy) two book set some years ago and have enjoyed  reading through and will be for sometime!  The writing is like reading a conversation.  (Helene is also known for her other work: The Weavers Book.     Another classic!)

I have seen some stunning coverlets quietly doing their job in movies: "The Patriot" with Mel Gibson and Heath Ledger. I had to watch it again  and freeze frame the movie to get a good look! It was a natural setting for a colonial coverlet. The coverlet that was wrapped around Dakota Fanning in "War of the Worlds", featuring Tom Cruise was a pleasant surprise!  Are you one of those weavers who's eye scans movie scenes for textiles and gets excited when you spot something handwoven ?  

Lets get back to our weaving  with overshot and some of the basics with the four shaft variety.  I need to point out here that these are simple guidelines and by no means complete. Just a small primer to pique your interest. I will post reading / study material list at the end.  These notes are based on an overshot study I undertook some years ago. 

Most new weavers are introduced to overshot at an early newbie weaver stage and usually start with a draft from Marguerite Davison's classic: A Handweaver's Pattern Book. Its still available to purchase after all these years.   The drafts in this book are for sinking shaft looms such as counterbalance looms. You can flip the tie up for jack looms. If you don't, it means you will be weaving the pattern upside down, which isn't a problem but it would be nice to see the front as you weave. This little detail would make it confusing for new weavers starting on overshot for the first time, in addition to handling two shuttles!

Overshot is a twill derivative using two threads to create a unit block. This means you can have four blocks on four shafts. One thread in each block, is shared by the next block. This one thread in common creates half units in between blocks of either all pattern or all tabby. (This can be expanded through to eight shafts but we'll stick with four shafts for this post) See what I mean by this in the picture below:


Block A is threaded on shafts 1 and 2.
Block B is threaded on shafts 2 and 3
Block C is threaded on shafts 3 and 4
Block D is threaded on shafts 4 and 1

Overshot is actually two pieces of cloth, being woven simultaneously; one is a tabby or plain weave cloth,  the second is the pattern that 'over-shoots' the plain weave. You throw one shuttle for the plain weave and a second shuttle for the pattern weft, beating *very* firmly between each shot. If you were to take away the pattern weft, you would find a perfectly balanced 50/50 plain weave cloth. The pattern weft should compact well but be 'lofty'  to cover and produce blocks of solid colour with no plain weave peeking through. Normally the pattern weft is twice the size of the tabby yarn. Traditionally, cotton for tabby and  with wool for pattern. 

 If the pattern weft is beaten properly into place, the circles are true circles (no ovals), twill lines are a true 45 degrees, and if there are three blocks of the same unit in the threading then it should make a square little box when three repeats of the treadling are complete (which equals 3 shots of tabby and thee shots of pattern weft, so beat well!)

I keep the 'odd' tabbies of treadles one and three to enter from the left hand side, and the 'even' tabbies of treadles two and four from the right hand side. Also I work with both shuttles, tabby and weft, on one side of the warp. If you end up with  divided shuttles then you have a treadling error to find!. The shuttles can be awkward to coordinate at first but you soon develop a rhythm. Be aware that many overshot drafts may say "use tabby" but don't show it in the treadling.  Then there are some that don't mention the tabby at all. They are assuming you know to insert it.

The tie up is a normal twill tie up { 1,2  2,3  3, 4 and 4, 1}    Tabby treadles being  1, 3 and 2,4.  You are working with six treadles.  You can tie up the tabbies on the far left and far right, or side by side at the end of the run. What ever works best for you. I placed broccoli rubber bands on the two tabby treadles so my bare or socked foot could feel which one I was using. One band for tabby A and two bands for tabby B. 

The majority of overshot is woven "as drawn in" which means you repeat the exact threading as your treadling. Old drafts say "tromp as writ" which is the same thing. 

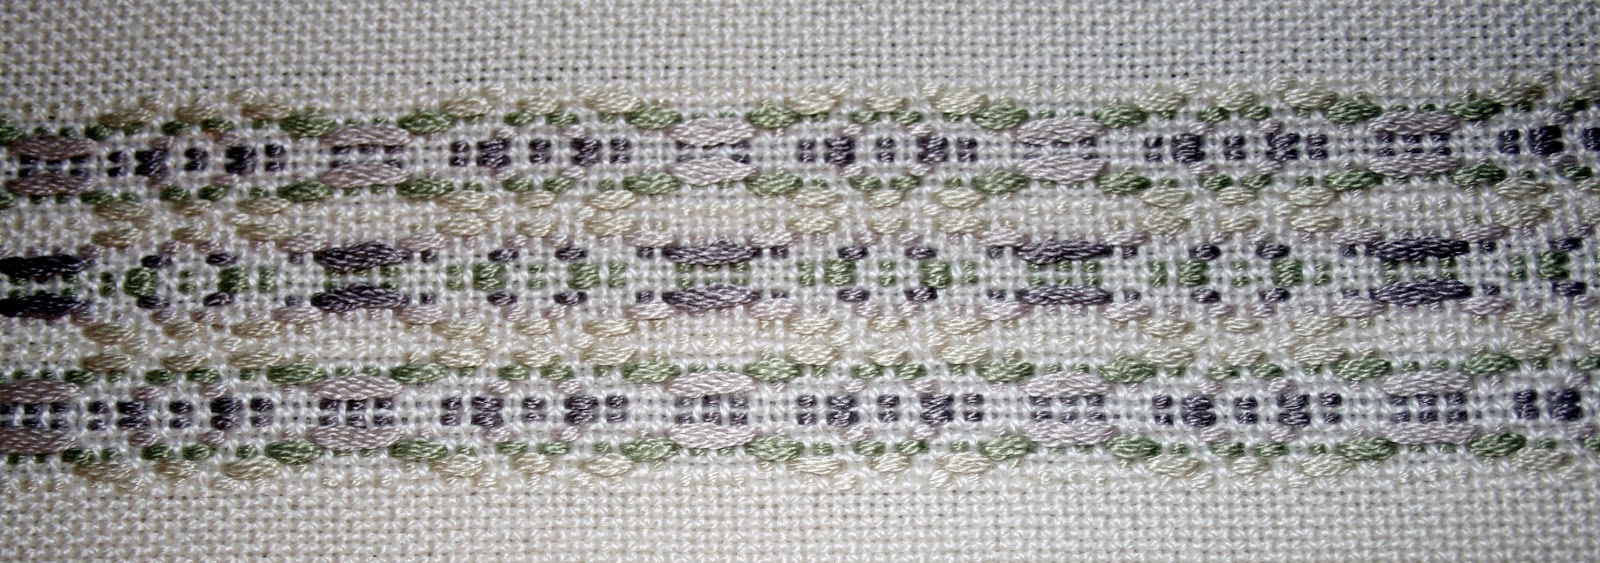
Twill fashion is where you treadle a block over again to produce exact squares. This may be more repeats than is in the threading. You can also follow twill treadlings such as: rosepath ( 1, 2, 3, 4, 1, 4, 3, 2, 1), point twill (1, 2, 3, 4, 3, 2, 1) , or broken twill (1, 2, 4, 3).  Its then called overshot treadled as rosepath, or treadled as summer and winter. There are many other ways to vary the treadling and these all make very pretty borders! The following examples are from my first level of the Guild of Canadian Weavers Test. I took portions of the treadling and created these border patterns. They had to have a purpose for being woven. Click to enlarge...

Embroidery floss ~  ladies pillow case border

Embroidery floss ~ flowers for a baby bib

Woven on "opposites" with no tabby ~  border on woman's apron

Chenille border on Christmas runner
Top: tapestry wool ~ border on woven sweater material. Bottom:   embroidery floss ~ border on table runner 
embroidery floss~ border on kitchen towel
Embroidery floss in six shades of blue ~border on kitchen valance curtain

You can also treadle "on opposites" which means you would use treadles 1, 2 versus  treadles 3, 4   or  2,3 versus 4,1.  There are no tabby shots in between. When you try it, what you get looks like this:

front view

back view

This sample is 8/2 cotton with equivalent 8/2 orlec woven in blocks of 'on opposite' treadling and no tabby. There is a border sample above woven on opposites you can go back and look at again.... I'll wait  :)

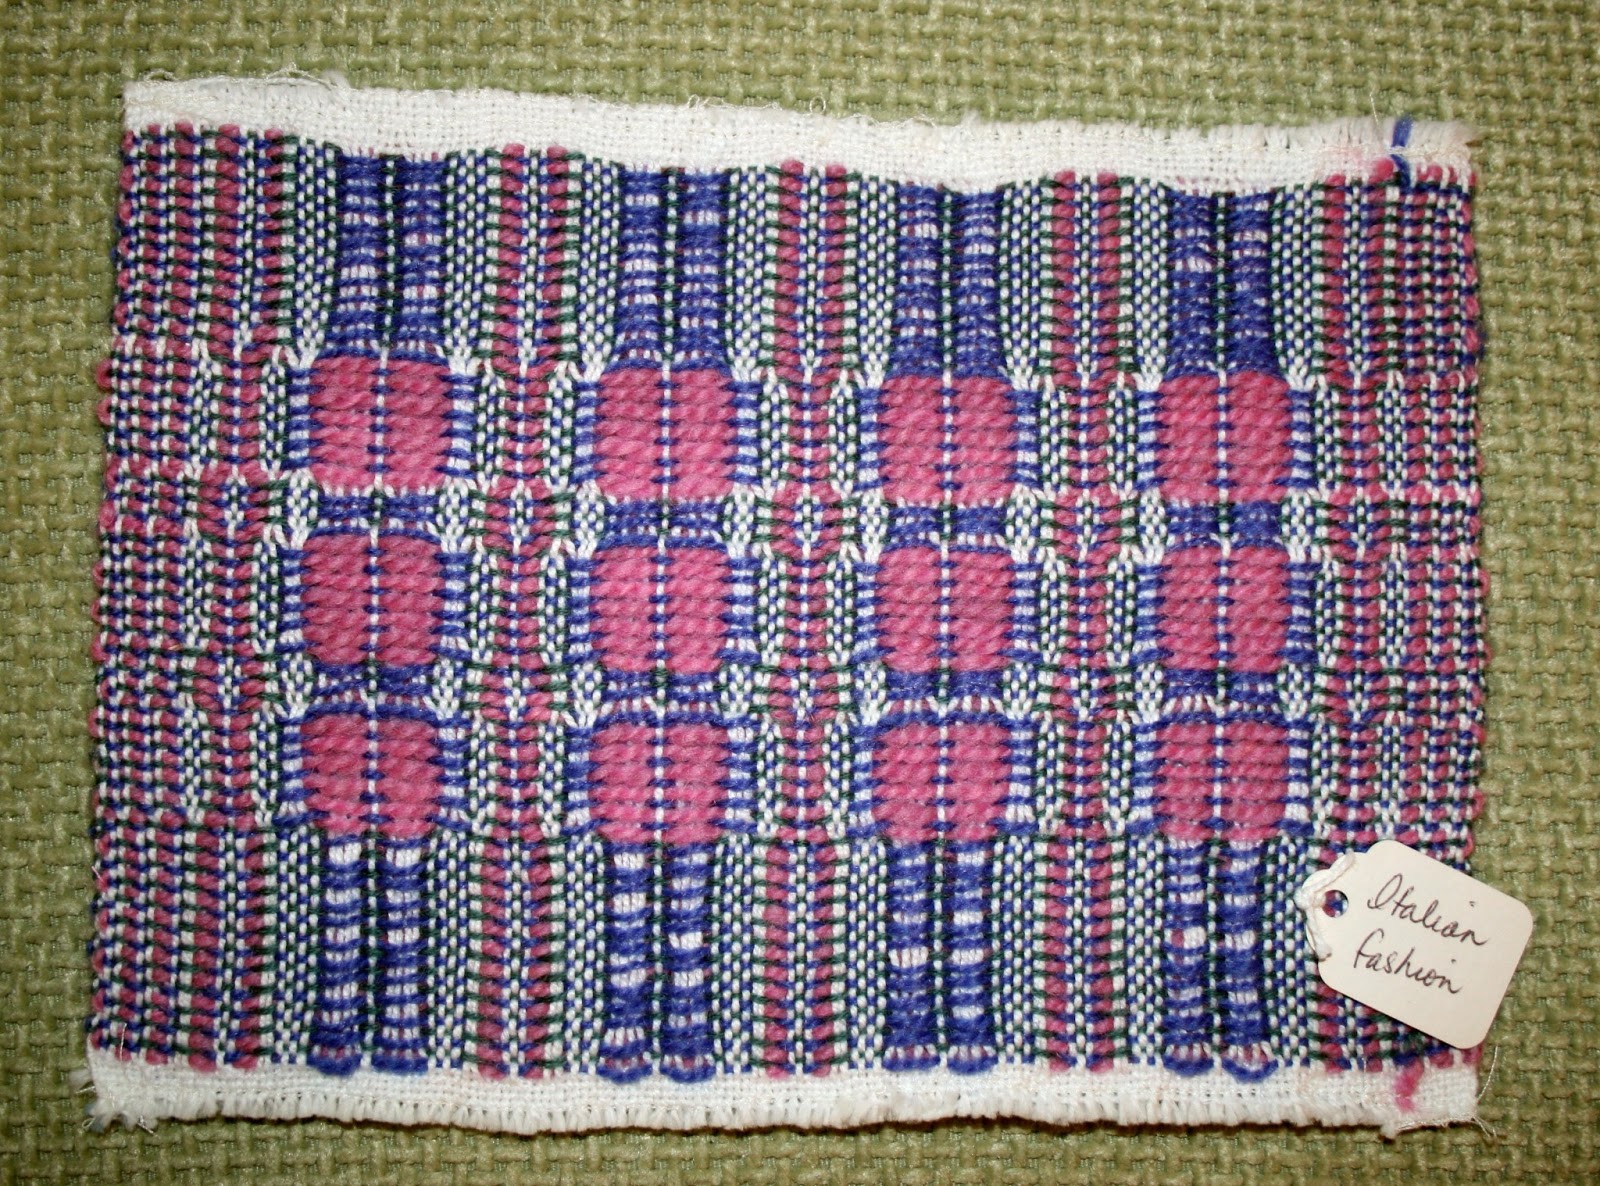
Then there is overshot woven Italian fashion:

front view

back view

This is where three colours are woven in given changing rotation of blocks, with no tabby again. It is similar to flame point where four or more colours are used in rotation.

There are six traditional pattern styles for traditional overshot:
  • Cross (A, B, C, D, C, B, A  Woven as drawn in, in either ascending/ descending order)
  • Diamond ( Threaded the same as Cross but the block is ascending / descending order: D, C,B, A, B, C, D   Start with center block)
  • Table (any two adjacent blocks, 5 units +/- woven to square, or,  drafted to be on opposites. See Davison pages 161,169, and 179
  • Wheel or Circles (blocks from basic motifs graduate in size from large to small to make circular patterns. See page 168 in Davison's book)
  • Star fashion (A, B, A, B,A   Treadles as threaded to produce an open pattern with diagonals and diagonal blocks more prominent.)
  • Rose fashion (threaded the same as Star but treadled differently. The treadling order is inverted to B, A, B, A, B. You substitute  blocks such as where there is an A, you use B, and where there is a C, you use a D. The results look rounded.)
Star and Rose fashion are mirror opposites!


Star fashion on "King's Flower" threading ~ front of sample. You can see the star pattern,  as well as the circles, diagonal twill line and squares


This is the back view. Note the small half unit blocks shown here. That's those shared threads between units.


Then there is Rose Fashion. See how the pattern is reversed and forms a flower in the center? Yea, its hard to see as I used a boucle yarn. Lesson learned?  Use smooth yarns for pattern weft!


Back view again with half units and you can see the reverse of the roses better here. It also looks like I was beating hard as my circles are now squares!


When designing overshot patterns you can place many identical units together and then continue through to other blocks but the turning point block in your design will have an uneven number of threads. When treadling, the turning blocks are treadled one extra repeat.


In the picture above you can see a sequence of blocks:  A, A, A, B, B, C, D, C, B, B, A, A, A. 
The D block has three threads with 4, 1, 4.

So besides bed coverlets, what else can you make with overshot? I have seen beautiful modern looking table runners, scarves,  overshot style borders on placemats and towels. I saw a beautiful (apparently) plain weave table cloth that had inlaid overshot motifs scattered like stars!  They looked like snowflakes on the royal blue cloth.   

I always thought it would be a neat challenge to weave overshot and have it look totally modern and comfortable in today's home. ( Its on my "to-do" list..) 

Here's my submission for the GCW test, level one. The pattern is called Honeysuckle (also known as Pine Bloom)


I used 10/2 mercerized cotton for my warp and 6/2 wool for my pattern weft for this four shaft tray cloth.


Let your eye wander and see the circles, the 45 degree angles and the squared squares in the centers.


Left is the top view, and on the right the back view with even clearer diagonal lines.


Here's the finishing: hemstitching, then rows of diagonal knotting.

By the way, all the overshot border samples shown previously were all woven on the same Honeysuckle threading. Very versatile weave structure!

So if you have followed me through to this point and are now thinking it might be nice to try some overshot study yourself. Perhaps try inventing some borders for towels? Here are a few books on overshot that are on my library shelf:

  • Weaving Overshot Redesigning the Tradition by Donna Lee Sullivan (ISBN 1-883010-23-3)
  • Creative Overshot by Margaret B. Windeknecht   Shuttle Craft Guild Monograph 31   (ISBN 0-916658-34-1)
  • The Complete Book of Drafting for Handweavers by Madelyn van der Hoogt, Chapter 4 (ISBN  0-916658-51-1)
  • Key to Weaving by Mary E. Black, 1982 edition
  • The Best of Weaver's ~ Overshot is Hot edited by Madelyn van der Hoogt (ISBN 10 1-933064-11-0

This post should give you much to chew on for a bit....next post will be a tad bit late but I will have lots to share when I do!

Saturday, June 15, 2013

Dancing to a Different Tune

For most loom owners, in particular jack loom owners, the tie up is relatively straight forward. Now if you own a countermarche loom, you can immediately double the number of tie up cords. The loom needs to have cords to both the shafts that sink and to the shafts that rise as the action of a countermarche loom evenly pulls the warp threads apart, both up and down, to create the shed. The benefits? well, usually the shed is generously large and it seems to me that you can achieve a more balanced weave due to the even tension when the shed is opened. This style of loom is easier on joints as pulleys make for a smooth action.


Above and below: countermarche loom showing tie up cords. These are not the normal cords for a CM but part of the 20+ tie up assist. You only use the ones you need but the loom is set for any and all possibilities!


Jack looms apply upward pull on some threads and the weight of the shafts lightly dip the warp threads on the bottom of the shed. Your leg provides most of the muscle to lift the shafts.

 Counterbalance looms (CB) are sinking shed looms and work best in pairs or more balanced tie ups. Weave structures such as 1/3 or 3/1 twills can only be achieved by adding a shed regulator such as the model Leclerc  makes for their  counterbalance looms.

Here's a link that will take you through the three types of looms, how they work and the pros and cons of them.

But let's get back to countermarche (CM) looms, and my Louet Spring 90 in particular!  Here she is brand new and not even her first warp on yet.


I love this little loom. It has all the pattern power that my big Woolhouse CM has but a much smaller footprint. It's an ideal loom  for weavers who have space problems or just don't want a large castle loom.  I have a 20+ tie up assist on my Woolhouse but with my front hinged treadles on the Spring, this isn't possible. The usual method for me is to lift the loom up, one end at a time (as its quite light), and set her down on sturdy plastic crates. I then sit on a low stool to work my tie up cords.

As many of you know I have some joint issues and so bending forward can aggravate the lumbar area of my back. I take my time setting the treadles cords up, taking a break and stretch, sometimes do something else entirely, then come back and do another couple more treadle tie-ups. I seem to use anything from eight treadles to twelve. If a full twelve is in play, that's 144 ties!

 In the past year or so I have been working a couple of projects off of one draft and tie up. Leaving the tie up in place and weaving a couple of different projects on the same style threading. I usually change the warp yarns and weft but use similar treadlings. I always try to find a new way to treadle and play with it a bit but I always end up becoming bored by the end of the second warp.

So with the current project on the Spring there is a twelve shaft / twelve treadle  tie up and it looks like this: *Be sure to click on any image to enlarge okay?*


As you can see this tie up when treadled in a straight run produces a nice twill line. The longest float is three ends whether warp or weft.  I got thinking this over and decided to play around with my weaving program and  plug in this tie up and then see what happens when I enter different threadings.   I can recall some weavers when I was a newbie telling me they had the same tie up for years. They couldn't all be weaving the same thing all that time (or could they??)

I had some interesting finds!  The "old tie up" shown above does change some things about various drafts, but its actually an improvement in some cases, as you'll see from the examples below. 

Now, some weavers, usually newbies,   like to follow 'recipes' and are comfortable with this. Then some weavers eventually look at a recipe draft and think to themselves " what would this look like if... or how can I change this bit..." and start playing around with the draft.  They go beyond changing colours and setts. Fortunately computer weaving programs now make this so much easier to do over the old pen and paper varieties of only a few years ago. There are a number of them now and many are listed in the back pages of your Handwoven magazine. Weavers can eventually progress from recipes to working up all new designs as they become more familiar with the weave structures and their 'rules of engagement' and their own personal confidence level increases.  Oh, there will be mistakes and some dubious choices, but those are how you learn. I still make them all the time :)

So if you already have a weaving program, or download a free demo, then you can try this yourself ! (Maybe this post will encourage you to consider purchasing one.)   I personally use Fiberworks PCW Silver Plus.  The 'plus' includes loom drivers for the Megado loom, so most new to intermediate weavers would only need the Silver version.  Let's take a look at what happened with some of the drafts when I combined them with what I like to call "the old tie up".

First I looked through my collection of drafts and found this:


This Gebrochene and Hind und Under and its a complex twelve shaft pattern. It would make a stunning table cloth if traditional linens were used. I made two projects using the same tie up.


...table runners in mercerized cottons


and tencel scarves.

So what happens when you change the tie up but keep the threading? You get this:


It still keeps the basic pattern but is now actually more defined. I like it!

Okay, so how about this draft:


This is an M's and W's design...another twelve shaft design, given the old tie up I want to use.  So I replaced the tie up with the existing one on the Louet Spring and it now looks like this:


I think this version is nicer than the original and I think you can expect to see this on the loom in the near future!  I couldn't find my twelve shaft snowflake twill but more or less know the theading by heart and so I made this draft up:


Again, this has the requisite tie up and I think it looks rather neat.  The stars will weave up quite large so I'll have to think about what the project will be. Runner? Shawl?

Are you starting to see the fun that can be had playing with the program?  It helps create new possibilities and with the confidence boost, you'll even start creating your own. 

Note that these drafts are all "woven as drawn in". There are even more variations possible if you change the treadling and play around with that portion of the draft!

Let me show you one more. This is a variation on a point twill and its treadled as its threaded. This draft has the tie up I want to use again.  


I call this one network diamonds as it looks something like that to me.  As you can see, the threading isn't overly complicated, the tie up is straight forward and yet the pattern is very interesting.

You can play with the program and add in border treatments like so....


What did I do to the draft? well I added another repeat to balance the pattern. That took one click, then some deleting to remove a portion of the repeat. Then I added squares on the right hand side so I could add three straight runs of one to twelve. I added the same to the left.  Click save. Then under 'weft' in the menu I clicked 'treadle as drawn in'....there is three straight runs at the bottom but there was no room  to include them unless I made the draft even smaller and then you wouldn't be able to see the details. So now the draft is balanced and has borders.   Need it wider? add another repeat or two...  We haven't even  on touched colours yet!

Some of you who like to use recipe drafts?  well here's how to start to modify them. I found a pretty draft in Complex Weavers Greatest Hits book called "1836" and once again I replaced the tie up. I appreciate this is a small image but you get the over all idea of the pattern. 


These are some of the designs that will appear in coming weeks and months, and maybe more, as I play with this idea some more! Like I said earlier, this doesn't include changing the treadling and playing around with that aspect.

Now, in a similar vein to the current topic.... there's new book out!


I belong to some weaving related groups on FaceBook. One is 4 shaft weaving and the second is 8 shaft weaving. One contributor is weaver Margaret Coe.  Margaret has been working on a book  called "4-8...Weave" (you can find more information on it here)  It was just released this past week and I have my copy in my hands.

I must be honest and say it only arrived yesterday so I haven't had time to go through it page by page as yet. What sold me on this book was Margaret's description of what she was trying to accomplish by writing it.  Basically, when you purchase a weaving program, and that's any of them, they provide you with a manual or help files that tell you how to utilize the program functions. How to navigate around and pull down screens etc. 

They don't tell you how to use it to be creative and actually make designs!

Margaret takes a weaving program, and in this case Fiberworks PCW Silver, and uses the computer program functions to show you how to use them to design and get the most from the program. She emphasizes that these techniques can be used with any of the programs out there on the market, many of which have free demos to try out.  It focuses on four shaft and 8 shaft drafts but these can easily be expanded to twelve, sixteen etc.  There are tutorials on snowflake twill, polychrome, interleaved, block substitutions- crackle, and more.  There are colour  pictures and very clear diagrams and screen views. I opened at any page and snapped a picture ( and I hope Margaret doesn't mind!) I plan to review it again once I've had time to work with it.


I was happy it arrived in time for this post on 'dancing to a new tune'. If this sort of design work interests you, or you want to learn to use your weaving program to its full potential, or maybe simply change up recipe drafts and personalize them then hopefully my post will encourage you!


On a personal note:
I saw my surgeon about my left knee and the short answer is, he wants me to wait some more. So I go back again in September and we'll take it from there. Apparently this knee replacement is a tough one to recover from as where the surgical scar is, is where you need to bend! There is much more pain after then with a hip replacement.   I reminded him that I'm a weaver and I'm not stopping weaving.  So, I'll continue to weave on, albeit more slowly. If anyone reading this is a weaver and has a knee replacement, I'd like to talk with you. My email is in my profile.

With my old legs slowing down, apparently my grandson Ethan is starting to use his and is now walking and most likely running!   Neat circle of life huh?