A few years ago I discovered a loom woven sash at a local antique dealer and wrote a blog post about the sash. It seems to get more than a few visitors even today from search engine results! After my one day workshop with Sash Weaver Carol James, I now know that it is not true ceinture fléchée. The real deal is done by hand. A true finger woven sash takes upwards of 300 hours to make! They eventually resorted to loom versions to reduce time and costs and this in turn put some of the handwoven sash makers out of business. They simply could not compete. It became a 'hobby' and the numbers of those actively weaving and teaching reduced steadily over the years. {I couldn't help but notice the similarity of decline between the sashes and the Aboriginal Dancing Blankets. A few dedicated weavers but overall, a greatly reduced craft. Though, no doubt in Canada, Quebec and Manitoba have the majority of those artisans still working with this technique.}
To me, its weft twining, such as many cultures use in some form or other. Sometimes its a special technique, the colours used or special pattern arrangement that uniquely connect it to a given ethnic or cultural group. In Canada, the Metis feel a special connection to the brightly patterned sashes and many of French Canadian or Québécois heritage, such as Acadians, also embrace the technique as a part of their collective history. My husband's grandmother (last name Godin) was of Acadian ancestory. It is an old and beautiful technique and quite time consuming to make. The fact they have a colourful past makes them all the more interesting! There is a lot of information on the Internet for you to browse if this historical aspect appeals to you
Meet Carol James, Sashweaver. Her blog is an interesting read! Carol wrote this book:
It covers basic techniques of finger weaving, and identifies potential mistakes and how to fix them. I bought her book some time ago and had every intention of giving it a try but you know how that goes! Life gets in the way and other looms call to you instead. So when I heard Carol would be here on the south end of the Island, I signed up! It was a one day workshop and Carol admitted that its a lot to learn in one day, especially when she teaches it as a seven week course in Winnipeg!
We started with small simple braids manouevring the threads on the table surface.
When we progressed to the next step, Carol worked one on one with each of us in turn to show us the two finger techniques necessary to work the threads. A scissor movement and a pinch and both done with threads everywhere in your hands! The scissor one always seems to catch me up and it meant you had to mentally repeat to yourself "scissor, pinch, scissor, pinch...." so no talking and total focus on the task in hand!
The support post was slipped into the back of the chairs and eventually as each student was shown the technique, the 'conga' line got longer and longer!
The rest of us waiting our turn worked on our smaller braids and tried varying colour arrangements of the threads. See the woman with the green top? That's Charlotte and her story is a nice one. She had a guitar strap made from finger weaving and backed with leather from the 1970's ( and possibly older) and she had attempted finger weaving back then. It has been one of her goals to recreate this guitar strap weaving and so she was excited to be there in the class. At one point, the joy of successively managing the finger movements and seeing her braid grow, Charlotte expressed her happiness! It was such a moving moment, so I picked up my camera and asked her to tell me again and I snapped this:
The rest of the class came from all parts of the Island: Duncan, Nanaimo, Qualicum Beach / Parksville, Coombs, Cobble Hill, Victoria and Cowichan Bay. In time we were all linked by our chairs and finger weaving away and Carol was valiantly moving from student to student as disasters happened. Dropped your entire shed? GREAT! let's see how to fix that! Edge threads all discombobulated? Lets's see how to reweave them! Some of us were frustrated at the slowness of getting and maintaining the finger movements and Carol commented that if we could master them successfully in one day, when she teaches it as a seven week course, she would be very surprised. It takes time to attain the muscle memory necessary to become proficient and do it automatically.
Carol had some amazing samples to show us as well. Let's see some more modern interpretations:
This is Carol's computer cover! Click to see the detail in the close-up shot.
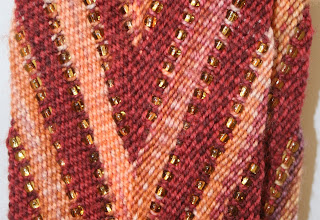
Here's a scarf that incorporates a painted warp and beads. Very pretty!
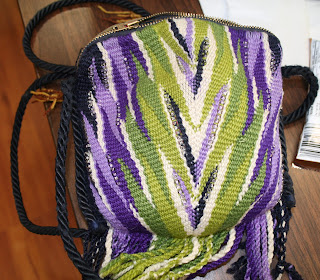
....and this is Carol's purse! It was simply lovely....
There was also more traditional representations of course. Below is an arrow and lightning sash:
This one has beads along with the arrow heads and lightning bolts and they are called pearls:
It has some weight to it! I don't know for sure but I somehow think it was for more ceremonial purposes.
This one reminded me of a blending of traditional and more modern colours. A nice combination.
This is an Assomption style sash. Carol told us the story of how the women who wove this style of sash asked for a raise in pay for their work and in time the Hudson Bay Company found a cheaper alternative.
Something like this. This is a loom woven (possibly Jacquard) sash which would have sped up the production time. Take a look at the close up and you can see the weft shots:
You can even see a skip! I can well imagine the conflict these produced. Cheaper, quicker and more affordable versus beautifully woven by hand which takes time and would cost more... but be traditional. Its the age old struggle for many artisans throughout time!
I purposely set both sashes side by side for a comparison:
I know which one I would choose but then I'm a weaver! Some people just wanted the colours and a quick sash... some went for the quality of hand made. It came down to the individuals and their taste, and what they could afford I guess. Traditional finger woven sashes nowadays are well beyond the reach of most!
That's the segue to a whole topic on pricing our products to reflect the true value of our time but I'll leave that for another day!
Carol published another book last year! This time is on an even older technique of Sprang. Perhaps a workshop next year on this techique?
Sorry about the flash glare but it was the best of three shots! The shawl that is on the cover was there as show and tell and it is delightful! Somehow I missed taking its picture.... oops! So some other examples:
Painted warp ladies vest....
Here Carol is modeling her sprang vest that also combines card woven bands. Both techniques are very old and shows nicely how both could used together to make a useable garment (albeit decorative!)
Carol told us about the military sashes worn by men of rank in 19th century Europe. The man with the sash was in charge! Old paintings depict many a battle scene and someone 'at the top' is there with a sash. Did you know that the sash was most likely sprang? I didn't know that!
Here is a military sash:
They could quite wide when expanded and very decorative. Carol told us a story of how George Washington accepted a sash from a defeated British General (who had been given the sash by his father in the early 1700's). George carried that sash throughout the Revolutionary War of Independence. It's stored and not on display at this time. Now that's a pity!
When I got home, not only were my feet tired but so was my head! There was a lot of concentrating done that day! I also had the handicap of being tired to start with as the night before when Calli our Airedale went out for her last call of the day, she bolted into the night after something! When she returned, she was covered in sticky black muck, most likely from the creek. So at midnight, she was hosed off outside and left to dry off and sleep in the laundry room..... except, she didn't get the memo! She cried and make a fuss all night long. The next morning, far earlier than I needed to be up or intended to be, I discovered she had done some 'creative claw work' on the back of the door. Apparently being smelly dirty should be no impairment to sleeping in her rightful place on her comfy bed UPSTAIRS! She doesn't go outside off leash any more and the new door arrives next Tuesday.
Does this face look like it could do something like that? Yup, and she'd do it again in a heartbeat too. She's a terrier (terrorist) through and through....


6 comments:
Wow, Susan! It almost makes one's head hurt to just consider managing all of that with just your fingers (and a stick with a binder clip!). The large samples at the end of your post are completely unimaginable and stunning. I think one of the greatest lures of weaving is that the depth of learning is endless. I'm sure I've never seen finger weaving prior to this post. Thanks so much for sharing. ....and who could believe that that sweet face at the end of the post could do any wrong!
Hi Susan,
Very interesting post on the finger weaving of the sash; sure is a lot of history there. Thanks for sharing. One of our weavers was a "Godin" her father was one of the founding members of the Cooperative Movement here on P.E.I. Perhaps Bruce has connections to P.E.I. Who knows.
What a night with the puppy, does insurance cover the cost of the door replacement, or is that taken out of Callie's allowance?
I finished my first warp of tencel and ever so proud of the results. The pattern did not turn out as expected, and somehow I made beautiful scalloped edges - go figure. 4 harness weave only, so quick to do.
Weaverly yours ..... Barbara
No way Mom! I would never ever do anything that bad...just sayin'
Wow, I never knew finger weaving or sprang could look like that! Years ago our guild had a program on finger weaving, very elementary, never saw anything like those examples you showed!
These are AMAZING!! Thanks for posting!
Just to clarify, in the side-by-side photo, the finger woven one is on the right and the machine on the left, or vice versa?
Also, about how wide are the larger finger woven pieces? They blow my little mind!
Hi Peg,
The woven one is on the left.
They were of varying sizes, but seemed to average between 6 and 8 inches in width.
They would be wrapped about 2-3 times around the waist and tied with the fringe. Being hand made, they could be 'made to order' depending on your waist size.
Susan
PS Both of Carol's book are for sale at her web site... and well worth it!
Post a Comment