Pages

Friday, August 28, 2009

New Toys

There's a new face in the studio. Meet Libby.... who sits on on the top shelf of Lilibet, my Louet Spring loom. This one was spotted when touring around town with my brother a few weeks ago. I resisted but she was still there when I went back. Must be fate! Connor our terrier thinks it's for him and he waits....and waits...

I know of some fibre enthusiasts who madly collect all things sheepish: mugs, stuffed ones, pictures, ceramic ones.... heck even real ones! I selectively bring home cute sheep. They are restricted to my studio and are nestled onto shelves, among yarns or tucked near books. There is only so much room so they have to pass muster to be among the chosen few.

I recently got word that a former member of our local guild was selling off all her weaving equipment and books. The loom and yarns were long gone, but I have discovered that it was sold to a friend so I'll be seeing it sooner or later. What perked me up was the ball winder and swift for sale! I have those already but my daughter needs them. She has taken up knitting and doing great! If you have a Ravelry account, her user name is 'Gnomenapper' and take a look at her projects and her toe up socks. (I'm in awe of sock knitters). Below is her swift which needs to find a long skinny box to begin its long journey to North Carolina. The ball winder is mine and is a duplicate of her winder which is already on it's way.

I also got a 36" stainless steel 8 dent reed for my Spring. It nicely rounds out my selection now and I have an 8, 10, 12 and a 15.

There were books of course!
This one of weaving around the world. The author's name is Anne Hecht and she did a nice job of recording the various methods in the major cultures world wide.


There has been some interesting Shibori showing up at blogs lately and so I snapped this one up and hope to give this technique a try! ( Thanks for the nudge Ngaire!)

I arrived home with goodies in hand to find that some back ordered books had arrived from Amazon in the mail. To further pursue studies in colour theory, I now have Deb Menz's Colorworks to mull over. ( sorry the image is a bit fuzzy...the camera battery died and is on the recharger)

The second title shows great promise! I have a major bead stash and would like to utilize my beads more and be creative with them. Maybe move on from just the 'fringe' of things!

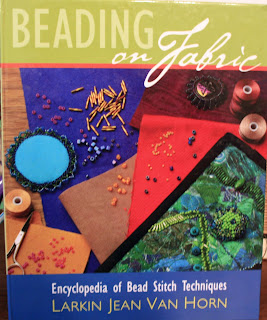
The author shows all the various securing techniques quite clearly and the book is a fun read and quite inspiring. This peek is a cross view of the various beads and ceramics and I have seen many at Beadworld. (though I plan to use what I got at home first.....honest!! :)

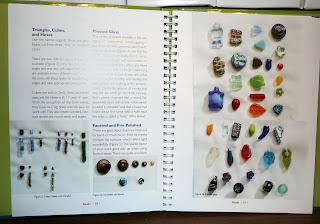
I have been weaving away on Elena's shawl and I'm two thirds the way through. I love the way the two blended reds literally glow on the loom. Using multiple shades of a colour gives it much more life! I'm hoping to have the shawl off loom before we leave on our vacation and complete the finishing once we get back. I'm also getting physiotherapy on my tricky right ankle and it's great to know that my weaving (and treadling) counts as exercise. My warm up at the loom before going for my treatment today impressed the therapist. (She also has magic hands)

So I have walked by Lilibet, the current naked loom and it just doesn't seem right. I thought "I'll just wind a warp for some scarves. 196 ends didn't take long , so why don't I just quickly beam this 9 yard warp? " That went fast ! ( I love the new method a la Jane Stafford!)
I wove for an hour on the shawl and took another stretch break. Next thing I know, I'm threading the scarf warp! Took a stretch break and wove some more of the shawl. This was multi tasking at its best.
After lunch, I lifted one end of the Spring loom and slipped some storage boxes under the feet, then lifted the other side. Spring looms are quite light! Tie up went okay... not too long time wise.

Once perched off the ground, I sit on a small stool and do the tie up in a much more comfortable position than cramped up on the floor. I have the spare treadles secured up with a single tie up cord. They are released once it's back down on the floor.

So I did thread it... any bets on what happened next?
Back to the shawl !

Thursday, August 20, 2009

Patiently Waiting

You know, looms are so incredibly patient....even when you neglect them for other looms. Try that with a husband! I'm sure mine would claim 'friendly neglect' in this house due to loom affairs from time to time ... (like dinner time. :)

I started a snowflake runner project on my Louet Spring loom 'Lilibet' some time ago but it somehow stopped moving ahead about the time Lynnette came for her visit and then other stuff intervened. Well, I'm participating in the Guild of Canadian Weavers weaving exchange again this year and since Lynnette is the exchange coordinator, I wanted to have the runner ready to travel when we go to the Okanagan in early September. We'll be visiting my MIL and will most likely see the new fire damage to our old neighbourhood first hand. I'll be at Lynnette's for a few days as well and I'm sure that we can find some mischief to get into and friends to visit.

Back to the home front and the studio.... no vacation just yet....
To refresh:

  • 2/16 mercerized warp in cream, sett 30 epi, using a 15 dent reed ( two per dent).
  • first runner woven with 2/30 natural linen, pre-dampened pirns.
  • woven with a temple to reduce draw in.
  • two runners woven to approx 38" in length, plus fringe.
  • third runner woven with medium grey 2/16 mercerised cotton to approx 42"
  • fringe twisted, so completely reversible.
  • pattern from Weavers magazine #18, page 20. Draft by J. Evans, GCW masterweaver.

Here are a couple of pictures of the linen runners on the loom.

I've done this pattern a number of times before, most notably five runners as gifts to the weavers in my old guild who lost their homes to the big inter-urban forest fire of 2003. I have noted that this has been another bad fire year and I'm weaving this pattern again. Maybe I should retire it?

This picture below shows the grey 2/16's well under way. I had just about finished the hemstitching. Not as subtle as the linen runners. (Also it is not as dark as this picture shows)
The linen runner going to the exchange was first up on the styrofoam board and the twisting went quickly. I used all three clips and made a rounder, firmer mini cord. (full how to's are here)

The grey runner is on the board now and I'm just about finished the first side. Using three at a time makes it go faster. The last linen runner will most likely wait its turn and be done after we get back from our time away.

So time to 'fess up to a failure. I tried a different weft before resorting to the grey cotton. I have some lovely 2/40 white linen from Ireland that I wanted to use as weft. I wound my pirns and dampened them a day ahead. It started so lovely! I wove for a time, then left it to make dinner. Started again the next day and had to stop to make a call. Then I noticed a line, then another where there was a visible change in not only beat but density of weft. It was nothing that laundering would fix! So I cut away about 10 inches of this lovely linen and choose the cotton instead. So, the 'Lesson Learned' : I can still use it for weft but I *must* weave the entire piece in one sitting. I put what was left of the linen into a marked bag and its now in my freezer waiting for that project. ( It better be soon as my bobbins are running low!)
Here's a close up detail of the 2/40 linen and two other pictures where if you look closely you can see the streaks:
Let's end on a happy note! Here's the finished runner for the GCW Exchange.


I'm leaving Lilibet naked (*gasp*) for now. I have a scarf warp to be wound and beamed on there next. Now I can concentrate on the balance of Elena's shawl.

Thursday, August 13, 2009

Elena's Shawl: getting under way

This is part two of Elena's special shawl.... these posts are being written with non weavers ( or a newbie weaver) in mind.

Okay, where were we? We're real close to starting on Elena's shawl... I take smaller half inch groups of warp and divide across the warp and then start by tying on the far left and far right groups to the apron rod.


This means the bar is supported and ready for the balance of the tie up.


In this picture I have done a surgeon's knot ( sort of like the first half of tying your shoe laces but with an extra wrap around) This holds all snugly until all groups are ties in place. Tencel can be slippery to work with but I managed quite well with this. Now once all are in done, we are about to do a dash from far right to far left doing up the final tightening and complete the top or last tie. Lift each group and take out the slack and quickly tie the second half of the knot and move to the next group. The key is to move quickly and decisively. Even with speed on your side, if you feel the warp tension you will find the right hand side is bit looser than the just finished left. As per Jane Staffords' method, take the flat of your hand and roll the palm over the warp from the left towards the right, easing up as you approach the right side. Do this two or three times and stop. Go make a cup of tea, and take a break... a 20 minute break. When you come back, the tension will be even and you can start.

At the very most, I *might* have to tighten the edge groups just a touch and that's all! Next I wound 4 red threads, divided between two film canisters, and the third is the floating selvedge. There is another on the other side of the warp. With twill patterns, the weft or filler yarn may not be caught at the edge every time and can produce a messy edge. Having an extra thread passing from front of the loom, through the reed, to back, but not threaded through a heddle, helps to keep things neat and tidy. The shuttle enters the shed (or opening when the treadles are depressed) over the floating thread and come out under the thread on the opposite side. It take just a short time to get used to and then becomes routine. {For weavers who do not want to use a floating selvedge, there is a method of where to start your shuttle to avoid this. We'll talk about this another time.}


Thanks to Lynnette, I now make a small separator to keep the canisters from tangling. A piece of card board and a hole punch. That's it. By the way, film canisters are now a rare breed! I snagged a bag of them from a camera department. I'm glad I did and hopefully I have enough for the coming years.


I have removed the hanging supports or cords from the lease sticks and pushed them to the very back of the loom. They are taped shut at both ends so secure. They will stay there until we see if there are any threading errors. They maintain the threads in order if we need to re work a section to correct a mistake. If all is okay, then they are taken out. Even at the back, they can restrict the threads from opening as fully as we would like.


The locking pin, which holds all shafts securely in place, is now removed. If you have a balanced tie up, the jacks won't move! They shouldn't with the 20+ in place. Note the hooks and texsolv towards the back of the jacks. These are shafts 9 to 12 which are not being used this time and are secured in position by attaching the cords to the hooks. If they weren't tied, then all the shafts would slump downwards and get in the way. ( you only forget to tie them up once!)


Time to wind the weft! In this project the weft is 2/8 black tencel and I'm carefully and tightly winding a pirn for the end delivery shuttle. You concentrate only on the last half inch and advance slowly and methodically.... until it's full. I normally wind three or four. Winding more pirns usually is timed to adjust the hanging canisters at the back and have a good stretch. For a great tutorial on winding pirns, go here.


My bobbin winder is an old late '50's or early '60's Leclerc model. It came with my very first used loom and all that was needed was to replace the foot pedal. Fifteen dollars at the local sewing machine repair store and we were back in business. ( I do have a manual hand winder as a spare. Power outages can happen :)


So here you'll see my blue scrap yarn that pulls all the warp threads into alignment. I throw three shots with no beating in between, then beat after the three are in place. I might need to do this a second time. The white yarn is for seeing the pattern better. I have treadled it running from 1 to 8 twice. The verdict is in and it seems I can't count.... there are no threading mistakes!

Those four red warp ends didn't appear anywhere else as an 'oops'. (phew!) I wove the border repeats and then I have hemstitched every 4 ends across the warp. But I didn't use the 2/8 tencel. It's a bit on the thick side and so will produce a thicker hemstitch line, which I really don't care for. The purpose here is this case is to secure the ends from moving and destabilizing the cloth, not be a feature. With some projects, fancy needle treatments such as trellis hemstitching, for example, are lovely. That would be lost with the size of the shawl and the patterning in this case. The picture below shows me laying in the finer silk thread. The silk has more 'bite' to it and stays snugly wrapped.

Here the hemstitching is going well and I'm taking the threads in groups of four warp ends. The twisted fringe later will be two groups twirled together. I'd like the fringe to be a bit finer than normal.

I'm using the larger version of my Schacht end delivery shuttles (or end feed shuttle as some call it) This means I can load more weft, cross the warp quickly and have nice selvedges. I'm not using a temple on this project and so it should go a bit faster. A temple 'stretches' the warp to keep the weft from drawing the sides in excessively. It must be moved every inch or so.

After weaving the border, and a couple of repeats I paused to look things over..... and, ta da! here it is:
Looking good! I will post more progress soon. I have another project that is time sensitive on the other loom as well. It's been getting ignored lately and that's about to change!

Thursday, August 6, 2009

Elena's Shawl: dressing the loom

As I mentioned previously, I'm about to start a project that is a custom order. The client is watching along with the rest of you! So some of this stuff might seem repetitious, but not to Elena. It's also personal as she discovers the process in my weaving her one of a kind shawl. Elena chose her yarns, colours and pattern. I determined the sett and total warp length based on yarns to be used and her decision on shawl length and fringes. I do get a free hand in the beading and I recently bought some at Beadworld in Victoria with this project in mind.

So all projects start on paper: The yarn we wanted was tencel (for beautiful drape), the colours are two shades of red wound together and black and yarn size is 2/8, the sett will be 24 epi. There is to be a small black border running down both sides and it will be 85" woven length and a shorter fringe at approx 6 to 8 inches. (I normally leave 12 inches) This is an eight shaft pattern, using 8 treadles; the threading is extended M's and W's with the treadling done in network twill ( a series of twill progressions all going in one direction to the middle of the shawl, then reversed at the midpoint to the end of the shawl) I have tried to do screen capture and it is not working out too well for me so will try to photograph the draft and insert here for you. As luck would have it, Blogger is flipping some of my images sideways (again). I tried loading from a second computer and still the same result, although I did not turn my camera sideways to get the shot. So the red bar is the top with the M's and W's threading and the black is the weft with the net work twill treadling.

What's the 'C' at the midpoint? Well, that's where I'll weave 42.5" (approx) and then reverse the treadling so the pattern will now be descending for the final half of the shawl. It's a subtle thing.

I forgot to take a picture of winding this actual warp but have an older image of another project at the top to show how the yarns ( in a given length measured on the board and in this shawl project is four yards long) is wound onto the warping board and then securely tied at regular intervals.

I wound my warp in one inch bouts as I'm using my hybrid sectional method ( and incidentally this will be my last time doing it this way for a while on my big loom as I'm going to work Jane Stafford's warping method to this loom. I will be taking the sectional rakes off after this project). There are a total of 589 ends over 24.57" at the reed. I'll be using a 12 dent reed and sleying 2 threads per dent.


I have long leader cords of seine twine attached at each sectional space. Long enough to bring the warp right up to the back of the heddles. I attach the end of the warp ( with the cross on this end) to the leader cross using a lark's head knot. Then I open the cross and slip onto the pegs. Please note the cross is secure with a loop of cotton. This stays on till much later!


I run my fingers between the two levels of threads and gently smooth away any snarls and using consistent tension I manually turn the beam. How much tension? Trust me it's tight!


The warp is tied snugly at regular one yard intervals and notice how there is no irregularity in warp length at the tie point? This section is going on well... When I get to the end and the last tie, I leave it in place and gently lift the cross section off the pegs and hand wind the entire section onto the beam. I repeat again that the cross is still marked with a loop of cotton and the last tie is at the end.

Below the picture is showing my progress across the sectional. I work right to left so my start was 12 inches from the centre point which you can see is marked with red yarn. I use small snippets of painters tape to hold the end in place.


Here the entire warp is on and now ready to insert the lease sticks.

I sit on a small stool at the back with the lease sticks securing them with tape at the right end and then free each section and then *being careful not to twist the bouts* slip the lease sticks through the cross. Once all bouts are on, I tape the left end closed and then pull up and over the back beam, hanging the lease sticks from the upper castle as close as possible to back of the heddles. Now I move to the front of the loom and gently pull all warp bouts through to the front. There are some small irregularities in lengths due to the leader cords not being exactly the same length . (I keep meaning to correct this and its apparently low on my 'to do' list.) In the picture below you can see the cross loop is still around each section. If everything is perfect, these can be cut off now. The last warp tie is removed one section at a time as the section is pulled through tightly, the end is snipped off the end loops and the tie removed. When all is done, you are ready for threading!
I sit on a low spinners chair ( as its four legs fit over my loom's foot beam). I use the pattern's natural groups guide the threading as I follow along with a sheet and small post it notes marking the current group I am working on . I double check and then continue on... Each one of the warp ends must go through the eye of a heddle to control its movement in the pattern. I take this part slower than most as I really don't like fixing mistakes after the fact! When I got to the end I seemed to be 4 red threads short. Oh dear!.... this means I've either miscounted at the warping board or there's an error in the threading. I guess we'll see which it is a bit later....
All done! Now we 'sley' the warp...
I rehung the beater bar assembly and slipped in a 12 dent reed into the slot. A reed does more than beat the weft into place; it determines the sett or density of the cloth being made. This reed has 12 slots or dents in a one inch space. I'll be bringing through or sleying two warp ends through each dent. This cloth will be 24 ends in every one inch space. I work my way from right to left, having determined the half way point by dividing the warp width (24.57") by half , so 12.29" or 12.3. This marks my starting spot.

I use a small plastic tool or hook to do this as I don't want to create metal snags or burs that will damage the yarns and cause breakage. Okay, sleying is all done and no missed dents.

Here you can see the threads lying evenly and even make out the two shades of red.

Now comes tying up the loom. With normal looms, there are many cords under the loom and they are secured according to the treadles according to the tie up on the weaving draft. For a countermarche loom like mine, some cords go to the upper lamms and some to the lower lamms. The end result is the threads are evenly pulled apart and back together again. It is a tedious job getting under the loom and one I dreaded. It means being curled up like a pretzel under the loom doing the ties and later adjustments and with a hip replacement in 2001, I don't bend so well. I literally don't have the full mobility I had before. (Now we won't discuss my being chubby ...) That's where the '20 + tie up assist' came to the rescue. All the tie up points are now secured with longer cords, that take a dedicated route to the back of the loom and up and out through a peg board at the back of the loom. I sit on a stool and pull the cords that are pre-marked to the right hole in the texsolv cord and can do 8 shafts and 8 treadles in under ten minutes.
But there are some things to consider when using the tie up assist. If you stand at the front of your loom, the shaft in the front closest to you is number one and the left hand treadle is number one but when you view the peg board, this is reversed and also flipped! Check the numbers on the board:
Treadle one at the front, is now the first one on the far right at the back. Shaft one is at the top and not at the bottom. So I sit with a large copy of the tie up and isolate one row at a time and transfer the information to a new grid which reflects the situation I'm facing. I clearly mark the sheet and save them in a folder for future repeats of the project. I'm building a library of flipped tie up drafts.

This is the new tie up sheet. The numbers represent the X's and the orange dots are the O's. The O's are normally tied to the lower lamms (or rising) and X's to the upper (or sinking). But in the case I will have to reverse this as it turned out that I was weaving upside down and I'd rather see the more definite side of the pattern this time! ( This pattern is reversible but I like the look of the other side better... and if I'm going to be looking at it for a while, might as well be the side I like!)

How does this work on the 20+ ??

So if we look at row 1 on the far right, I pull and clip shafts 1, 4, 7 and 8 to the lower lamm cord...the cord on the opposite stays loose. Then I pull the cords for shafts 2, 3, 5, and 6 to the upper lamm cords on the corresponding left hand side.... the opposite cords stay loose. Scroll up to the picture showing the peg board with pulled cords and it will be more clear. You can see how there are two rows of holes for each shaft. You'll see that I have pulled cords for 8 shafts and the bottom cords still hanging are shafts 9 through 12 which are not being used. ( Those shafts are secured up at the top of the jacks by cords to hooks to keep the shafts from dropping during use)

Don't let all the cords fool you, it's very easy system. There must be a cord for very possible tie up option which in this looms case is 384 cords. ( 12 shafts and 16 treadles)

So in the next post we will be tying onto the front beam, fiddling with my floating selvages and extra ends in their film canisters, then starting to weave with some scrap yarn. We'll see if there are any errors to fix or we can get busy weaving!