Pages

Tuesday, July 27, 2010

The Finishing Fling

I have been feeling 'pinned' lately much like these scarves! I had originally thought that these would be a quick project being plain weave and featuring colour, but apparently not. I might be the 'queen of twill' as Lynnette called me, but it seems I have a lot to learn about plain weave.
I took the first two red stripe scarves off the loom and immediately wound on the greens. I thought I would do finishing on the reds while weaving off the greens. I had them pinned out on my old board and worked out the twisting order to keep the colours solid over the barber pole look.
While I did lose some of the colour intensity, the finer black silk weft did a great job. Please notice the straight selvedges. (Not because I'm showing off, but because this is important for my story later on. )

I'm able to twist groups of equal size except for the two little red stripes and I'm okay with the little skinny group. I can work that up with beads and such.

Above you can see the reds are done and I'm weaving away on the greens. At no point did I have any trouble with the tension. In fact, it was beamed on wonderfully and I'm enjoying the weaving very much. (okay, don't get too far ahead of me now! :)
Next up was beading and I went for red beads on the black sections and black on the red, then a fancy 'special' midsection. It was fun choosing! They are only 5 inches wide so this didn't take very long.
A little star for the midsection on one red scarf.

Meanwhile, the greens are off the loom and now being fringed. Sorry these pictures are a bit dark but something seems to be wrong with my Canon DSLR. Sometimes the flash works, sometimes it won't... and even when it does, its not really bright. Mind you, these are dark colours!
Same as before, colours were twisted onto each other and went quickly. You can see how nice the edges are here!

I put some of my new green beads to work and got them all tricked out in an afternoon.

Here's a close up of the work under way...

All done and this one shows the centre feature showing a little dragonfly. Our yard is full of them this year!

All four scarves went into the laundry tub for a good soak and gentle wash, rinsed and then hung to drip dry outside under the upper deck. There was a nice breeze that day and they dried quickly.

The edges now have a wavy edge and the centre stripe seems to be so much 'tighter' then the solid green or black tencel. It's all tencel, but the variegated portion came from a different source.
The selvedges seem 'lumpy' now.... what the heck is going on here??

What was beautifully straight and smooth, looks like this now...

and like this....
In fact out of four scarves, only one is okay as far as edges are concerned. I was not happy and tried to think what had gone wrong! The centre tightness I could understand as the two types of tencel are from different sources. This problem disappeared with careful steam ironing thankfully. Love my Rowenta with 400 steam holes!! In fact the scarves are buttery soft despite the tighter sett. I'm left with nasty edges to deal with. So I did what any other weaver does at a time like this, you call your BFF and whine! Lynnette recommended I try the cord edging trick like she had done with her edges on her echo weave scarves. This sounded fantastic and I got right to it.
I used 4 ends of black tencel, wound two against two ( to mimic the small coloured group in the fringe). The length of yarn ran down an entire hallway to a door knob at one end of my house and me stretched away at the other and twisting like mad! I got it as tight as I could but even after you knot the end and release, some twist comes out. This means as you hand sew it on (yes, hand sew) you must add additional twist to keep it firm as you go.

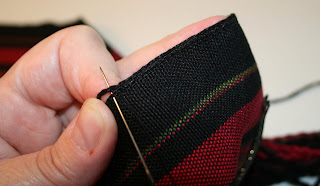
I settled on this method. Which ever side the thread comes out on is my starting point. So with extra twist applied and securely held by my thumb, I sew through the scarf edge and into the cord.

Then come back from the other side the same way. This would hide the sewing thread neatly and produce no visible evidence. This goes on for the entire 72 inches of one side, then I flip and do the other. Yes, I'm that crazy to do this but if I don't do something, these scarves won't sell at all and be a total waste of time, yarn and $$. So much for my fast and easy project!

So before you think this is silly, take a look at the edge now behind the sewing area! Smooth and straight! Yes, there is a bit of a ridge where the cord is, but so long as its consistent along both edges, it looks like you *planned* it. :) The end of the cord just blends in with the rest of the twisted fringe.

Here's the green edge all done...from nasty to nice! Thanks Lynnette!

So this is my current work area as I have the second side of a red scarf to cord up and then a final green scarf. To keep my nose to the grind stone no new project is going on the Louet Spring until this remedial work is done by way of as a reward. So I plug in my iPod and turn on my bright light and sit in the cool studio and stitch away....
Send in a search party if you don't hear from me again soon huh? This post has gone long so I will save the finishing of the second white shawl till next time...

Friday, July 16, 2010

A Box of Bling!

We've been working pretty darn steady around the house and yard (okay, mainly my hubby) but I supervise! We decided on Monday to take the afternoon and go to Victoria for some shopping and just take our time and enjoy the day. I had gone through my entire bead stash and I only had one green bead type and that's not enough to make a choice for beading a scarf, and I have two scarves coming up to bead. Desperate situation indeed! Hubby wanted to go to Lee Valley Tools who opened a new store in Victoria and he had a list in hand of things we *need*.

So after a slow leisurely browse, we left Lee Valley with a torch for blasting weeds along the driveway and sidewalks ( nicer than weed sprays), some hand tools for furthering the efforts in the gardens ( post to come on this soon) and something called a hitch for our tractor and the riding lawn mower to be able to tow garden carts and even the larger trailer. ( A really big deal in the man's list of neat tools he *has to have*. I didn't take any pictures there... I simply forgot!

Next two stops were for me! We were heading by this shop on our way to the bead store so naturally I had to stop in. Knotty by Nature is a cute little store and they carry fleece , fibre for spinners, knitting accessories and knitting yarn, spinning wheels, some small looms, and weaving yarns. They carry 8/2, 8/4 cottons, boucle cottons, some linens.... *lots* of really neat stuff!
Here.. have a look!

I sent this one to my daughter, Carrie, via my iphone to 'share' my fun time.... she dyes her own colourways and braids them up just like these below for her Etsy shop.

Around every corner you turned, there were more goodies and such vibrant colours! It's a nice place to have a good browse and look at other brands and what they are doing for colour and different put-up's. Great music playing when I was there as well.

Another corner and here's the weaver's corner, complete with Ott light and sample books. In the second picture you can see the smaller cones in behind the Ott light, these are specialty yarns from Habu. They even had Korean paper yarn for weaving and knitting. Those are the bulky skeins on the right of the table.


I bought two half pound cones of bamboo in off white and a richer cream. I have some silk scarves in mind and these will be the wefts. Helps to stretch the silk and still be a soft yummy scarf! The balance of my small bamboo stash at home are all bright colours and I wanted some neutrals.

I took this picture above and it wasn't until later at home that I realized that I hadn't really checked these particular skeins out... so I obviously will have to go back and remedy that! (maybe that was a good thing?) Great colours!

They had a Saori loom set up and they welcome people to try their hand at it. They have other small looms and rigid heddle loom they rent out as well. It certainly introduces the whole world of weaving and spinning to knitters. They have diverse ways of persuing fibre depending on their interest. A great little shop!

Just a short hop up the road found me at the Johnson Steet Market. It's a neat ring of brick buildings with a courtyard in the middle that is open, bright and cheery... and you walk down a flight to the lower portion, with little shops everywhere. You could spend a whole afternoon drifting from store to store in this one location alone. For the men who might tag along, there is a neat old camera store that handle modern, recent and antique cameras, plus a little Mexican restaurant where they can have a coffee or a bite.

I ignored all these lovely distractions and went straight for my goal! Bead World. Its huge and has beads of all kinds, of all colours, and all accessories you might need. I was there for 'greens' and hit pay dirt! Come have a look and tell me you could take less than an hour in here!
The hanks on the walls behind the ladies are semi precious stones all prestrung on fine cotton. I leave those alone as they are a little rich for my tastes.

I head to the tables with a tray for the neat little funky accent beads and the basic seed beads are in the little containers on the shelves. All sizes... from smooth to irregular cut, metallic, antiqued... and in a rainbow of colours!

This area is where I spent much of my time and it didn't disappoint! After an hour or so, I left with my little bag of goodies and called Hub to see where he found parking. He was just up the road from where he dropped me off and parked outside of *another* bead store "Bead Works". He was visiting the book store next door and had found some golden oldy magazines. Now isn't that convenient? So a quick look around in there and I found some fine Japanese Delica seed beads in a soft twinkly violet that I have been trying to find for ages! They also carry Thread Heaven which I use all the time so its great to know where I can get more when the time comes.
This is part of the lower courtyard at the Johnson Street Market and you can see the bench seating for the music stage. The shops are on both levels and face into the courtyard and some the main street.

Lots of hanging baskets of bright flowers. In fact, Victoria is also know for all the hanging baskets they hang every spring all through the down town area.... over 1600 annually and probably closer to 2000!

Here's the drinking water fountain in the upper levels, with flowers in behind. Then I stepped back to shoot the baskets hanging in behind...

The message board is just outside a kids store for funky toys and gadgets.... and the message is advertising 'bacon' flavoured dental floss! Anything to get them to clean their teeth I guess!

So here's the picture of the loot that followed me home:
These should tide me over nicely doncha think?

We had supper out and a leisurely drive home..... it was a great day!

Monday, July 12, 2010

Rose and Thistle ~ A Rennaisance Lady

Recently, as a little celebration of reaching the magic 100 number for followers I decided to have a small giveaway and the prize was a skein of silk. The first name drawn, Rose and Thistle was a long time follower and sadly didn't answer my email and announcement here. So after eight days we drew another name and Diane Dudfield in New Zealand was the lucky recipient. Then out of the blue, or grand move across state lines, came Martha, our missing Rose and Thistle! I sent her a skein of silk as well. :)

I have enjoyed my email chats with both ladies, both weavers in diverse parts of the world. Martha besides weaving also enjoys a love of English history, in particular, the Elizabethan period Well, so do I! Its part of my ethnic history being English by birth and curious by nature.

When I found out that Martha designs, sews and wears her own period costume I was (to quote my dear friend Lynnette) gobsmacked! The sheer amount of research, hard work and effort to be able to do this is simply stunning! They did not wear simple clothing! I have heard that the 'rich and well heeled' wore elaborate clothing to demonstrate their ability to afford what many could not; to also show that they need not work as we know it and have all their needs met by others who wore much more basic, rustic and less colourful garments. I have a book shelf with many books on the history of textiles: Viking grave finds from the 1950's complete with long boat and garments. A recent acquisition is one on Saxon medieval clothing that I'm working my way through. What am I going to do with this side interest? I'm not exactly sure, but Martha sure has it worked out! I asked her to be a guest on my blog and share with you what she does, and how she does it. So, with out further delay, here's Martha!

My Elizabethan dresses on display in a shop window for the Christmas season; sorry it is not a great picture. The shop owner was intrigued that anyone could design and sew their own period correct dresses and thought my costumes would be interesting in her front window. This was my very first and only time displaying my work to the public.

To design a dress I research period painting and manuscripts taking bits and pieces of dresses I admire and then construct a dress of my own design. I use a technique known as draping, which basically means I drape muslin fabric on my own dress form for each piece of an outfit. I figure out the measurements needed for each item and construct a muslin of that garment to make sure it meets my design criteria and that the piece is as historically correct as I can make it. The muslin 'pattern pieces' are then used to cut out the fashion fabric which is then sewn as needed.

All pieces of an Elizabethan outfit are designed, fitted and sewn individually by me. Everything from the chemise, farthingale (hoop skirt), underskirt (over slip), forepart (the triangle decorative piece you see under the split skirt), over skirt, bodice, detachable sleeves and jewellery have been created to be as close to historically correct as I can achieve with modern fabrics and notions.

My husband and I dressed for a renaissance fair. I made all the clothing on both of us - the dress is made from a wonderful dark blue and silver brocade with lovely French inspired fleur de leis motif.

Although you cannot see it the forepart is heavily beaded with fresh water pearl beads, as are the detachable sleeves that are draping down behind my arms in this photo. The bodice is beaded with large fresh water pearls around the top and bottom of the bodice as well as the shoulder straps. There are large pearls encircling the bottom of my split skirt all around the hem. You can just see them above the black velvet hem guard. I imagine this photo was taken on a 90 + degree day as my detachable sleeves are pushed off behind my arms. Note the chemise with hand done black work embroidery on the collar ruff.

My husband and I enjoying a show at a renaissance fair. Again, I designed and created all the clothing we are wearing.

I named this dress 'La Cherri' - I designed it with lots of dark creamy garnet colored velveteen and gold toned brocade. If you look closely, you can just see the lovely gold and garnet sleeves and front pieces to the bodice. The bodice was a labor of love! It is covered in hundreds of small gold metal beads and tiny garnet beads. The beads glitter in the sun beautifully.

This is the very first Elizabethan dress I ever designed and created. It is made from red velveteen; there are eight full yards of velveteen in the hand done cartridge-pleated over skirt. Although the dress is very hot to wear to a renaissance fair in August, I do as it is not every day I get to dress up and wear beautiful clothes. The forepart is made from a lovely red and silver silk brocade and it beaded on the lower hem with large fresh water pearls and red cut garnet beads. The girdle and bodice jewellery are made from pearls and red beads. Note how dusty the black velvet hem guard is; this hem guard is period correct and really does protect the expensive fabric of the main skirt. Pretty smart invention don't you think?

This my latest attempt at period correct clothing. It is an 1860 teal blue velveteen and dupioni silk walking dress. This outfit was designed from the skin out, including all period correct under garments. The ruffles and rushing you can see on the under and over skirts took me over a week to pleat by hand, iron and sew. I hand covered all the buttons with the matching silk. The hat was purchased from a Victorian catalogue and I added some feathers and silk flowers to the brim thus making it period correct and a little bit over the top.

An 1860's wedding dress in burgundy and black changeable dupioni silk. The fabric is lovely and I adore how it changes colors in the sun. Underneath the skirts I am wearing a wired bustle that makes the the back of my skirts stick out thus giving me a sort of ledge sticking out the back end. It was a strange style if you ask me, but was all the rage then. In case you are wondering, it is not too hard to to sit down in this outfit. You sort of push the wire bustle up a bit and proceed to sit down, although you cannot put your back against the chair (which I understand was a bad thing for a lady to do anyway.)
Susan, you asked how I came to have an interest in recreating period correct clothing.

I have long been interested in the English renaissance and after a chance visit to one, the very best Renaissance Fairs in the United States, I discovered that people could design and wear the lovely clothing of that period. After a lot of research, tons of reading and many hours of dissecting period paintings, I taught myself how to draft, drape, create and sew my own period correct clothing. It is a point of pride for me to be able to create what I 'see' in my head, although we do not have the exact type of fabrics used in the Renaissance, I have tried to remain as true to the period as I can by using what is available today.

My Victorian dresses are designed after looking at hundreds of pictures in period women's magazines; magazines like Godie's Ladies Magazine. The dresses and under garments from this period are so much easier to construct because period references for seamstresses are still available today. My love of Victorian dresses dates back to my earliest memories of picture story books. When I was a young girl I would dream of wearing fine long dresses and how they would feel and look on me. The desire to dress up has never gone away; that young girl is till here today hiding inside of me.

You also inquired if my weaving ties in with my costuming and that is a hard question to answer. Yes and no. I have woven tartan arrisades for myself and friends to wear with various renaissance Scottish costumes we own. I have also woven and sewn a kilt for my dear husband to wear to the fair. I don't mind telling you that was a ton of work and finding the wool tartan yarn was difficult, but find it I did!

Pirate sashes (think Johnny Depp and the Pirates of the Caribbean) are also something I have designed and woven for various friends who attend the fair. I have not woven yardage to be sewn into the ladies nobility clothing I love to design and wear. The cost of the silk and metallic threads is price prohibitive for me, as a single dress is made from at least ten yards of fabric. As you can imagine it is much cheaper for me to buy the fabric over weaving it, although I do think about it often.
Susan, my thanks for listening to my ramblings about the costumes I have designed and sewn. It is nice to know that other people find it interesting to learn about my passions. I need to get back to my beloved looms and start weaving again; as you know it has been a long stretch of no weaving for me. The move from Illinois to Utah has kept me from my looms way too long and I am looking forward to returning to my first love.
All the best, Martha

Thank you Martha for taking time to gather pictures and text together and share with us all here! Making the muslin overlay sounds much like our sampling process before weaving! The 1860's gown and it's changeable burgundy and black is like the iridescent effect we weavers can create by mixing the right colours, fibres and sett. I understand fully the high cost and long task in weaving your own yardage for such beautiful gowns but perhaps areas like the forepart or the bodice would be fashioned from your own woven cloth?

The pirate sashes would be styled much like the Quebecois or th sashes ones woven and worn by the Seminole of Louisiana. They wrap two or three times around the waist and worn with flair!

Arisaids are long tartan shawls worn by Scottish ladies and can be worn in a variety of ways as this link demonstrates (scroll down half way the page) 

Martha mentioned the Renn Faire and their summer season are about to start and she wishes she could be there. This last link gives you a great overview of the Renn Faire phenomenon and it popularity world wide but in particular the United States.
The name Rose and Thistle? Well that's for Queen Elizabeth the First and her cousin Mary, Queen of Scots. Those are also the names of Martha's looms!

Now if you have any questions about this post and the period costuming for Martha, I'm sure that we will both be viewing the comment section and will reply there.

This embroidery shows the Scottish thistle, the English Rose and the Irish Shamrock.
(Image from Google free images and no crediting source.)

Tuesday, July 6, 2010

Smooth Operator!


This was as yummy as it looks! I baked this crustless quiche for our supper and Hubby thought it deserved a picture. Ham, mushrooms and Swiss Cheese with yellow bell pepper garnish. Its the Bisquick box recipe and I've been making it occasionally for 28 years and every one is different. This one lived up to it's great looks! :) Great hot or cold....

So now to what's happening here. Lots of garden work (post on that to come) and with an incoming heat wave promised by the weather forecasters that will slow progress there to just watering what has gone in as 'newbies'.

In the last post, I mentioned my new plain weave warps where the emphasis is on the colour. To repeat, it's 8/2 tencel set tightly at 36 epi, 5" wide woven and warp length of 72" for the two scarves in first red and then another warp in green. (I haven't counted the ppi.) I'm using 30/2 fine black silk as my weft. I get a rhythm going and gradually pick up speed...and then on autopilot I listen to my podcasts. Its pretty basic, but you know, it's actually a nice change of pace! I'll be ready for something a bit more challenging by the end of these four scarves.

Here's the second red under way. You can see that I just wound the variegated yarn as it came off the cake. I didn't try to pool the colours but will try next time.

The only thing that slowed me down was having to uncoil my hanging threads! I somehow missed two and they ride side by each. They tend to wrap themselves around each other and so I punch hole in a small piece of cardboard and thread the yarn through.


Keeps the 'Kids' neatly separated and no snarly messes! So two days and two scarves later, the next warp was quickly beamed and here's the green mix:

So olive was added to the black and Northern Lights. There is more than a touch of this green in the variegation and so it all pulls together nicely.

Here is the first portion of scarf number one! Um, I'd better give some thought to what is next at this pace and start winding! I'll then have four scarves and a shawl in the finishing pile so lots to do!
Show and tell to come when time allows. Are you doing summer weaving? Spinning outdoors? Heck, for those of you down under winter is prime weaving time and you don't have that nasty distraction we get in the middle of our winter *Christmas!* Only 171 days away!