Pages

Showing posts with label 8/4 cotton. Show all posts

Tuesday, September 30, 2014

Starting Early for a Late Finish

Shortly after I started weaving back in 1996 I found a big stash of soft Monte Cristo cotton at my local yarn store. I bought some skeins and again in my future visits, I would add another skein or two.  I wasn't sure what I would weave with it but had some thoughts of trying my hand at the  boutonne  technique. Roll the clock ahead to 2014  and I still have a bin with eleven skeins of this soft plushy cotton.  (I'm still going to try weaving boutonne style!)

Its been a yarn stash waiting for a project and that day has finally arrived. I'll be the first to say that in the intervening years my yarn selections tended to the finer end of the scale, so this is like 'rope' to me now. Its lovely soft cuddly 'rope' and perfect for a baby blanket. (Henry's Attic sells it to retailers)

Yes, I'm going to be a Nana again in the spring! 

I have lots of time and I also don't. I'm looking at a total knee replacement and recovery period sometime this winter and then throw Christmas into the mix and .... well, time is short!   I'd rather not be trying to make something that *special* with a recovering knee as I don't know the healing time frame.   So I'm starting on it now.


I looked at all my drafts, then my samples .... then I googled Monte Cristo and determined setts. Its thick and fluffy and I was beginning to think that plain weave was all there was to choose from. Then I found a baby blanket project by weaver Sally Orgren that was perfect. Sally is an amazing weaver and its worth checking out her projects at the link.  The blanket is a combination of plain weave,  five thread huck and window panes.  So I changed the colours of the window pane outline and modified the huck lace to add a second style of lace blocks.  Its a six shaft, eight treadle draft. Sally also had it set for direct tie up and I changed that too.  Then it occurred to me that I would be weaving it on my Louet Spring 90...and it would be the full width!


So first order of business was to wind all the skeins into balls..... and that took some time as you can imagine... I would stand and wind the warp for a bit, then sit and wind a cake on my rest break.

I used a Woolhouse ball winder for making the larger cakes. Doesn't get used much around here so I even had to dust it. I normally use the smaller Royal brand for the finer yarns.


Wound the warp using four full skeins of cotton (plus five ends of a new cake) and got it set up on the loom for beaming. I had pre washed four skeins in advance to help reduce shrinkage. It was like trying to duck marshmallows under water! They also took four full days to dry! The colour brightened up to a soft cream.


Bruce helped me wind on the warp and it took a while for a few reasons. Its thick, its full width, its thick, and its stretchy!  Below you can see the bow in the lease sticks.  The stretchiness of the cotton made it akward. Do I pull the stretch out now or endlessly deal with it later?  I felt like a newbie all over again. I opted for being consistent and we took our time.


Finally we got it all done. It was a slow process with the cotton binding in the raddle. The 8/4 cotton (doubled) was also behaving weirdly too. It was acting slippery. I'd never thought I'd say that about 8/4 cotton!


Before I could thread, I had to tie back all the extra heddles out of the way. I think you'll understand my subtle message when I say I used PINK cotton ties.   I don't know anything concrete but its a suggestion!


As you can see from the pictures above and below, I used just about every dent except for these seven! I used a ten dent reed and sleyed one per dent. Lots of wriggle room there.


Normally I like to lace on but somehow that felt like I would be playing with the warp like a bungee jump and I opted to tie on. The 8/4 was tied separately as I didn't want them 'quarrelling'.


I must say that I loved the look of the warp from the back. All straight and orderly. It also shows just how full the loom is! My widest warp on it to date.


I ended my day by winding several pirns and loading up the bench with my tools for the next day's start!


So yesterday I tightened and closed the knots and then laid in 4 shots of scrap 8/2 cotton to bring the groupings closer together. Then I placed two thin warping sticks and then  threw four more shots of cotton.  As you can see from the close-up below, it really works to get things neatly braced up and ready to go. This cotton is soft and spongy and if you ever needed a "two stick start", its on a project like this!


I wove approximately five inches and then started with the coloured divider.   Then weave ten shots of plain weave and then weave block A lace, ten shots of plain weave. Repeat and do block B lace in the centre of the next window.  Its hard to see the lace as its cream on cream. Actually, I don't really expect it to behave like my recent lace projects at all and form tight groupings. The Monte Cristo is too fat and fluffy to allow crisp definition. It will be more of a central grouping of texture to break up the plain weave, with a touch of colour. The ends will have beige satin binding to secure the edges.


In the picture above and below there is lace in the centres but the flash brightens the warp too much....


....so I turned the flash off and you can just make out the lace below.  As I said, this will be more texture than anything!   I started to wonder if I should just treadle plain weave for the entire length but Bruce says it looks better than these pictures show.  


So that's where I finished.  It will be a slow weave as I'm using a temple against the inevitable draw in, moving it frequently and I'm using a larger 15"  Schacht EDS shuttle and having to give it a real good throw to cross the warp. I may switch to a heavier AVL and see if that helps!  

There is warp enough for two blankets so this will take awhile!  Good thing I started early then huh?


Sunday, April 10, 2011

A Necessary Diversion

With all that we have on the go around here lately, I was caught a bit off guard by the reminder email for the workshop I signed up for! My first instincts was that if I had some down time, I'd rather stay home and weave, but I started to think about it. It was just what I need right now. Something new and fun and..... a day away from home. Besides, it's another workshop by my friend Alison and she makes them informative and fun!


I had signed up for two of her classes, with the second one is all things 'inkle looming' to be held in May. In this workshop we are learning basics of Kumihimo and in particular, Konga Gumi (which means small round braid). You will want to click on some of these pictures to see detail better!


As usual, Alison had meticulous notes with many clear diagrams, all neatly presented. There was a basic card neatly notched, a weight (a film canister with pennies!) and our warp materials. We marked our cards with the compass points and the direction to turn, then warped up eight ends (four light, four dark) and got started. After an inch, we added in eight more ends of four light and four dark and adjusted to the increase. The basic moves didn't change, just the number of threads we were were working with. Then we altered the colour sequence, sometime by moving only two threads and created quite different pattern. 
Here is my braid well under way!


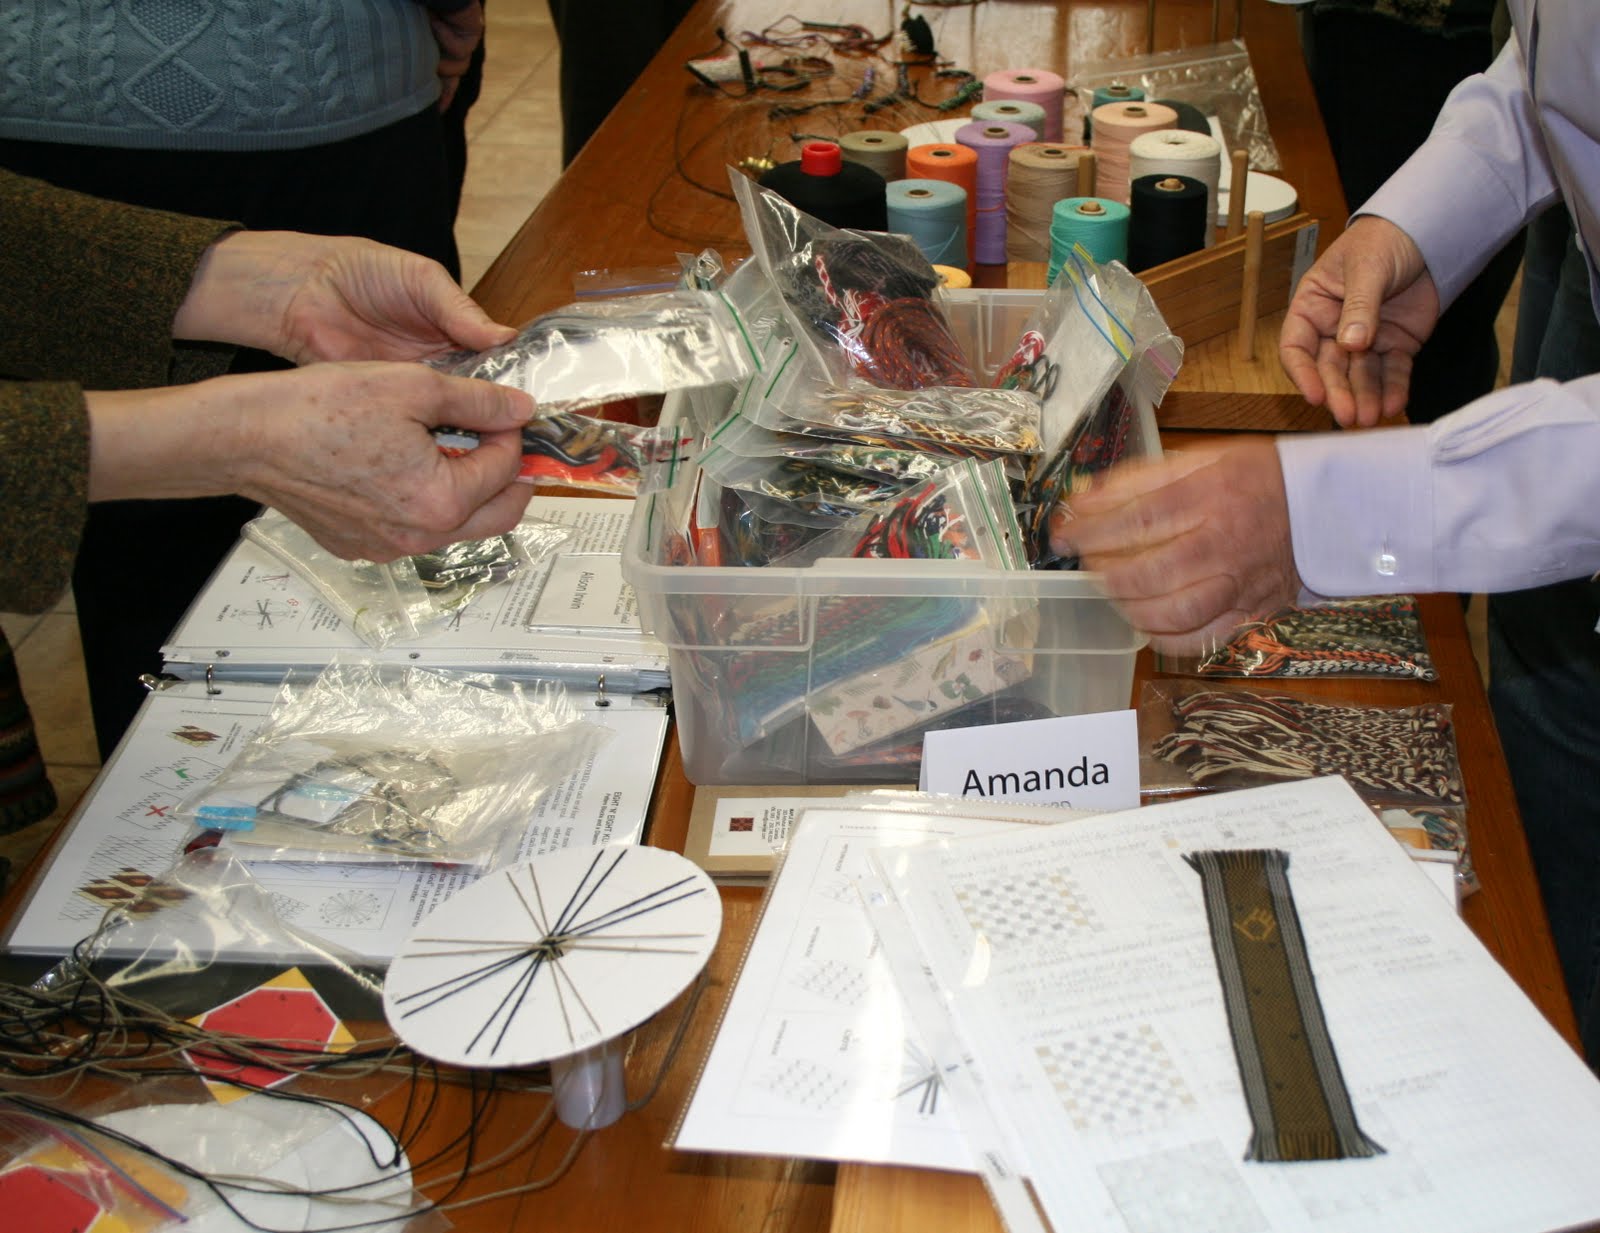
You can see quite a difference between the eight end braid and the sixteen ends by the big jump in physical size of the spiral near the bottom! We worked our way through six pattern changes over the course of the morning.  During the lunch break, the sample table up front was a popular spot:


There were twelve participants from all over the southern island. So what are they looking at? It seems that Alison loves kumihimo  and its potentials and has been creating samples for years. Apparently there is even an article by her on this subject in a past Handwoven.


That plastic storage container is *full* of zip bags *full* of braid samples, along with short notes on colour and pattern arrangement. (Yes, that's an inkle sample featuring pick up!  That's the next class in May....)

Here Alison is showing some of the class the various samples. She is wearing a Japanese vest featuring warp and weft ikat.

There was a selection of her reading materials and sources of inspiration.....


All those samples have been made either on the simple card stock, foam disc or this unique invention! Click on the picture and see..... Its a slide carousel! There's a card stock on top to reduce the size of the centre hole but the notches are perfect for holding the yarn in place. The stand also was a thrift store find and is a round metal ring with four metal legs. In its former life, it held a glass for a candle. Beside this is a marudai  that friends gave her, which is not in use as yet. Even her tama's are also unique! Tamas being the weights that hold the yarns.


Normal tama's are hollow and filled with a set weight of lead. These are little wooden 'cups' which I think she said are candle holders from a craft store (now long closed) that she fills with coin. There is a small wooden knob she found that acts as a lid. Smart!


Different coins add up to different weight! I just love the ingenuity.... It seems that fibre artists of any ilk, all have a bit of the inventor to them as we quite often borrow tools and make them our own.
You'll never guess what this is.....


There was no real way to photograph this well! First of all, it a foam kumihimo disc and its upside down. I hesitated to touch it given the delicate warp. The braid is tight and features a spiral and its being made from horse tail hair! Its a bit of a challenge and Alison took it on. 

After lunch we got back to work... and this is just a sample shot of other students, Diane and Anna working, but everyone was equally very focused on their cards or charts!


We all used 4/8 cotton 'warps', all had light and dark combinations but below is Cynara's braid with sharp contrast black and white which really shows the pattern! Nice transitions too...


The pace became more relaxed in the afternoon as we all braided away and looked at how to compose patterns. Alison has developed her own system that is quite simple and makes sense. The graph design looks much like the braid. Can't give you more than that as its a trade secret!


 Alison passed around some interesting braid projects. Above is a braid she made for a birder friend. The thinner braid has a long red wood thing with a screw in the bottom. When you twist the red wood 'knob' (for the lack of a better word) it makes a noise just like a robin!


This braid was simply beautiful! The picture doesn't do it justice. It was a soft variegated cotton yarn that ranged from violet mauves to a soft green. What Alison did was cut a given number of ends (8) starting at the mauves and an equal number (to total 16) starting at the greens. As the pattern progressed they reach a mid point, the soft pale green with no apparent pattern and then reversed. The blue/purple diamonds shift to green diamonds. I found myself thinking of some nice variegated tencels I have at home when I saw this one!

Here's one that is for my Canadian ~ American friends! A braid that looks somewhat similar to the red maple leaf and then transitioned to the red, white and blue. I thought that she must have added in the blue but Alison said she used a clasped weft technique!

My class mate Barbara brought along her Rodrick Owen book and I recalled that I have a copy of this fabulous book! I mentioned to a friend Linda at Ravelry that I had taken this workshop and she beat me with this!

"Hey! What’s the chance! I spent yesterday and will [be] heading back within an hour or so to a class run by Rodrick Owen. A friend of mine had taken his class a number of years ago and told me that at his age, he’s going to get to the point that he doesn’t travel well anymore….so I needed to take the class! So I took the plunge.
We did 8 strand braids yesterday and will do 16 strand braids today. He is quite old now, and his hands shake so much that I think we all held our breath as he demonstrated finishing the ends with that needle. But he didn’t come away bloody and has such a well of knowledge that it’s just an honor to be in his class."


......Okay, you win!    :)